In the previous parts of this series, I’ve built a working Certificate Enrollment Services infrastructure from the ground up. I installed and configured the Certificate Enrollment Policy Web Service (CEP), the Certificate Enrollment Web Service (CES), and eventually used these services from both domain-joined and workgroup computers to request certificates. So far, every service is a single point of failure. If the CEP server became unavailable, clients could no longer retrieve certificate enrollment policy. If the CES server became unavailable, certificate enrollment through the web service stopped altogether. For a lab environment this is perfectly acceptable. For a production PKI, it usually isn’t.
Fortunately for me, CEP and CES were designed with redundancy in mind, so in this part I’m going to extend the environment with a second CEP and CES server. At the same time, I’m going to introduce dedicated DNS aliases: CEP01, CEP02, CES01, and CES02. Until now, our service URLs have been tied directly to the underlying server names such as lab-srv-03. That works, but it unnecessarily exposes the physical server identity as part of the service configuration. By using aliases instead, we separate the name of the service endpoint from the server hosting it. This also gives us much more flexibility if we later want to replace servers or change the architecture without changing the names clients use to access the services.
Introducing aliases means there is a little more work to do. DNS, TLS certificates, Kerberos SPNs, CEP and CES service URIs, and the published enrollment endpoints all need to agree on the new names.
So, let’s build the redundant environment first. In the next article, we’ll find out how highly available it really is.
Microsoft Certificate Enrollment Services series
This article is part of a series covering Microsoft Certificate Enrollment Services from architecture and deployment to high availability and troubleshooting.
- Part 1 – Understanding the Architecture
- Part 2 – Installing the Certificate Enrollment Policy Web Service (CEP)
- Part 3 – Installing the Certificate Enrollment Web Service (CES)
- Part 4 – Using Certificate Enrollment Services in Practice
- Part 5 – Building a Highly Available CEP/CES Infrastructure
Lab environment
For this article, the lab has been expanded with a second CEP server and a second CES server. The resulting environment consists of the following systems:
| Server | Role |
|---|---|
| lab-dc-01 | Active Directory Domain Controller |
| lab-srv-01 | IIS Certificate Distribution Point (CDP/AIA) |
| lab-srv-02 | Enterprise Certification Authority |
| lab-srv-03 | Certificate Enrollment Policy (CEP) Server – 1 |
| lab-srv-04 | Certificate Enrollment Policy (CEP) Server – 2 |
| lab-srv-05 | Certificate Enrollment Web Service (CES) Server – 1 |
| lab-srv-06 | Certificate Enrollment Web Service (CES) Server – 2 |
| lab-srv-07 | Domain-joined test client |
| lab-srv-10 | Offline Root Certification Authority |
| lab-srv-11 | Workgroup test client |
Both CEP servers provide access to the same Active Directory certificate enrollment policy, while both CES servers ultimately submit certificate requests to the same Enterprise Certification Authority on lab-srv-02. This gives me an excellent environment in which to investigate how Windows behaves when multiple enrollment service endpoints are available.
Preparing DNS
Before adding the CEP and CES servers, I first need to make sure that each service can be reached using a dedicated DNS name. Instead of exposing the underlying server names directly, we will use the following names throughout this article:
| Service | Server | DNS name |
|---|---|---|
| CEP01 | lab-srv-03 | CEP01.corp.michaelwaterman.nl |
| CEP02 | lab-srv-04 | CEP02.corp.michaelwaterman.nl |
| CES01 | lab-srv-05 | CES01.corp.michaelwaterman.nl |
| CES02 | lab-srv-06 | CES02.corp.michaelwaterman.nl |
For this lab, I’ll simply create four DNS A records. Since the servers already have their normal host records in DNS, I can use PowerShell to resolve their current IP addresses and use those addresses when creating the additional records. Run the following commands on the DNS server:
$Zone = "corp.michaelwaterman.nl"

Add-DnsServerResourceRecordA `
    -ZoneName $Zone `
    -Name "CEP01" `
    -IPv4Address (Resolve-DnsName "lab-srv-03.$Zone" -Type A).IPAddress

Add-DnsServerResourceRecordA `
    -ZoneName $Zone `
    -Name "CEP02" `
    -IPv4Address (Resolve-DnsName "lab-srv-04.$Zone" -Type A).IPAddress

Add-DnsServerResourceRecordA `
    -ZoneName $Zone `
    -Name "CES01" `
    -IPv4Address (Resolve-DnsName "lab-srv-05.$Zone" -Type A).IPAddress

Add-DnsServerResourceRecordA `
    -ZoneName $Zone `
    -Name "CES02" `
-IPv4Address (Resolve-DnsName "lab-srv-06.$Zone" -Type A).IPAddressI can verify the newly created records using Resolve-DnsName:
Resolve-DnsName CEP01.corp.michaelwaterman.nl
Resolve-DnsName CEP02.corp.michaelwaterman.nl
Resolve-DnsName CES01.corp.michaelwaterman.nl
Resolve-DnsName CES02.corp.michaelwaterman.nlWe deliberately keep these endpoints separate. Later in this article, I’ll configure multiple CEP and CES endpoints and examine how Windows selects between them when they have equal priority, including what happens when one of the services becomes unavailable.
Granting the servers enrollment permissions
In the previous articles, I created the GG-T0-PKI Enroll TLS Certificates Active Directory group to control which systems are allowed to enroll for TLS certificates. Before requesting certificates for our new CEP and CES endpoints, all four servers need to be added to this group. I can add the computer accounts using a single PowerShell command:
Add-ADGroupMember `
    -Identity "GG-T0-PKI Enroll TLS Certificates" `
-Members "lab-srv-03$", "lab-srv-04$", "lab-srv-05$", "lab-srv-06$"This grants the following servers access to the certificate template through their computer accounts.
Note! After adding the computer accounts to the group, restart the four servers before continuing. Computer group membership is included in the machine’s security token and will not automatically become available to the existing computer session. A restart ensures that the new group membership is applied before we start requesting certificates.
With the permissions in place, I can move on to preparing the certificate template that will be used for the CEP and CES TLS certificates.
TLS certificate template
In the previous articles, I created the “LAB Active Directory TLS Certificate” template for issuing TLS certificates to the lab systems. Instead of creating another template from scratch, I will use this existing template as the starting point for our CEP and CES certificates. For this scenario, however, I need to make two changes to the enrollment process. The CEP and CES servers will be accessed using the DNS names we created earlier, such as CEP01.corp.michaelwaterman.nl, instead of only their actual computer names. I therefore need to supply the certificate subject information ourselves.
For demonstration purposes, I will also configure the template to require “CA certificate manager approval“. This allows me to demonstrate the complete lifecycle of a pending certificate request: submitting the request, approving it on the Certification Authority, retrieving the issued certificate, and finally installing it on the requesting server. Open the “Certificate Templates Console” by running: “certtmpl.msc“. Locate the “LAB Active Directory TLS Certificate” template, right-click it and select “Duplicate Template“.
On the General tab, configure the new template as follows:
- Template display name: LAB CEP CES TLS Certificate
- Template name: LABCEPCESCertificate
Next, open the Subject Name tab and select:
- Supply in the request
- Use subject information from existing certificates for autoenrollement renewal request.
This allows me to explicitly provide the subject and Subject Alternative Name (SAN) when creating the certificate request. Next, open the Issuance Requirements tab and enable:
- CA certificate manager approval
With this option enabled, a certificate request will no longer be issued immediately. Instead, the CA places the request into its Pending Requests container until a certificate manager explicitly approves or denies it. Finally, verify the Security tab. Make sure the group has at least: “Read“, “Enroll” and “Autoenroll“. Because the template was duplicated from our existing TLS certificate template, the remaining cryptographic settings, EKUs and other properties can remain unchanged.
After saving the template, it still needs to be made available by the Certification Authority. On the Enterprise CA, open the Certification Authority console, right-click Certificate Templates, and select:
- New → Certificate Template to Issue
- Select LAB CEP CES TLS Certificate and click OK.
The CA is now ready to accept requests using the new template. Unlike the certificate requests I used earlier in this series, however, these requests will deliberately remain pending until we approve them.
Requesting TLS certificates
With the certificate template published and the required permissions in place, I can request the TLS certificates for the CEP and CES endpoints. Because the template is configured with Supply in the request, both the Subject and Subject Alternative Name (SAN) are provided during enrollment. For each server, we use its newly created service name for both values:
| Server | Certificate name |
|---|---|
| lab-srv-03 | CEP01.corp.michaelwaterman.nl |
| lab-srv-04 | CEP02.corp.michaelwaterman.nl |
| lab-srv-05 | CES01.corp.michaelwaterman.nl |
| lab-srv-06 | CES02.corp.michaelwaterman.nl |
The PowerShell script below uses Get-Certificate to submit the request. An important detail is that -DnsName populates the SAN extension but does not automatically populate the certificate Subject. I therefore explicitly specify the Subject using -SubjectName. Since we enabled CA certificate manager approval, the CA does not immediately issue the certificate. Instead, Get-Certificate initially returns a Pending status and the request is stored in the local machine’s certificate request store. The script periodically checks the request using Get-Certificate -Request. While the request is awaiting approval, its status remains Pending. Run the script with for example:
.\Get-CepSepCert.ps1 -DnsName cep01.corp.michaelwaterman.nlOn the Certification Authority, open Pending Requests, locate the corresponding request, right-click it and select All Tasks → Issue. There is no need to restart the script after approval. On its next check, Get-Certificate detects that the request has been issued, retrieves the certificate from the CA and installs it into the Local Computer → Personal certificate store.
Source code of the Get-CepSepCert.ps1 script:
param(
    [Parameter(Mandatory)]
    [string]$DnsName,
    [string]$Template = "LABCEPCESTLSCertificate",
    [int]$PollSeconds = 15
)

Write-Host "Requesting certificate for $DnsName..."

$Request = Get-Certificate `
    -Template $Template `
    -SubjectName "CN=$DnsName" `
    -DnsName $DnsName `
    -CertStoreLocation "Cert:\LocalMachine\My"

Write-Host "Current status: $($Request.Status)"

while ($Request.Status -eq "Pending") {

    Write-Host "Request is still pending. Waiting $PollSeconds seconds..."
    Start-Sleep -Seconds $PollSeconds

    $PendingRequest = Get-ChildItem "Cert:\LocalMachine\Request" |
        Where-Object Subject -eq "CN=$DnsName" |
        Select-Object -First 1

    if (-not $PendingRequest) {
        Write-Error "Pending request for $DnsName could not be found."
        break
    }

    $Request = Get-Certificate -Request $PendingRequest

    Write-Host "Current status: $($Request.Status)"
}

if ($Request.Status -eq "Issued") {
    Write-Host "Certificate for $DnsName has been issued and installed."

    Get-ChildItem "Cert:\LocalMachine\My" |
        Where-Object Subject -eq "CN=$DnsName" |
        Sort-Object NotBefore -Descending |
        Select-Object -First 1
}Repeat the same procedure on the remaining CEP and CES servers, changing only the DNS name supplied to the script.
Preparing the CEP and CES servers
Before I continue with the configuration, both CEP and CES servers need to be prepared in the same way as described in the previous two articles of this series. I’ve covered these steps extensively when we first installed the Certificate Enrollment Policy Web Service (CEP) and Certificate Enrollment Web Service (CES). There is little value in repeating the complete configuration here. If you are building the environment specifically for this article, use the previous articles as a reference and make sure the following prerequisites have been completed.
Active Directory preparation
If not already present or configured:
- Create the security groups for the CEP and CES servers:
GG-T0-CEP ServersGG-T0-CES Servers
- Add the corresponding CEP and CES computer accounts to these security groups.
- Create the Group Managed Service Accounts:
gMSA_CEPgMSA_CES
Server preparation
On the appropriate CEP and CES servers:
- Install the Active Directory PowerShell module on all four servers.
- Install the corresponding Group Managed Service Account.
- Add the gMSA to the local
IIS_IUSRSgroup. - Install Internet Information Services (IIS).
- Configure the required Windows Firewall rules.
Install CEP and CES
Finally, install the appropriate Certificate Enrollment Web Services:
- Install the Certificate Enrollment Policy Web Service (CEP) on:
lab-srv-03lab-srv-04
- Install the Certificate Enrollment Web Service (CES) on:
lab-srv-05lab-srv-06
Follow the configuration from the previous CEP and CES articles, including the use of the corresponding gMSA for the IIS application pools. At this point, there should be two independently functioning CEP servers and two independently functioning CES servers. The individual services are installed, but they are not yet fully configured to use the service names we introduced earlier.
Configuring the CEP service principal names
In the previous CEP article, I registered the HTTP Service Principal Names (SPNs) using the actual computer names of the CEP servers. For this configuration, however, clients will access the services through the dedicated DNS names CEP01 and CEP02. Kerberos therefore needs to associate these service names with the account under which the CEP IIS application pools are running: gMSA_CEP. Instead of deriving the SPNs from the members of the CEP security group, I explicitly define the service names that will be used by the clients.
$gMSAName = "gMSA_CEP"

$CEPServers = @(
    "CEP01"
    "CEP01.corp.michaelwaterman.nl"
    "CEP02"
    "CEP02.corp.michaelwaterman.nl"
)

$SPNs = $CEPServers | ForEach-Object {
    "HTTP/$_"
}

Set-ADServiceAccount `
    -Identity $gMSAName `
    -Add @{
        ServicePrincipalName = $SPNs
}I can verify the result with:
Get-ADServiceAccount gMSA_CEP `
    -Properties ServicePrincipalName |
Select-Object -ExpandProperty ServicePrincipalNameAt this point, Kerberos can correctly map both CEP service names to gMSA_CEP.
Configuring the CES service principal names and delegation
The CES configuration follows the same approach as CEP, instead of deriving HTTP SPNs from the members of the CES security group, I explicitly configure the service names that clients will use. For CES, however, there is an additional requirement. The CES service must also be allowed to delegate credentials to the Certification Authority. We therefore configure both the HTTP SPNs for CES01 and CES02 and the Kerberos constrained delegation targets for the CA.
$gMSAName  = "gMSA_CES"
$CAName    = "lab-srv-02"
$EnableProtocolTransition = $true

$DomainFqdn = (Get-ADDomain).DNSRoot
$CAFqdn     = "$CAName.$DomainFqdn"

$CESServers = @(
    "CES01"
    "CES01.corp.michaelwaterman.nl"
    "CES02"
    "CES02.corp.michaelwaterman.nl"
)

[string[]]$SPNs = $CESServers | ForEach-Object {
    "HTTP/$_"
}

# Add the CES HTTP SPNs without replacing existing values
Set-ADServiceAccount `
    -Identity $gMSAName `
    -Add @{
        ServicePrincipalName = $SPNs
    }

# Retrieve the CES gMSA as an AD object
$gMSA = Get-ADServiceAccount `
    -Identity $gMSAName `
    -Properties msDS-AllowedToDelegateTo

# Configure Kerberos constrained delegation targets
[string[]]$AllowedToDelegateTo = @(
    "HOST/$CAName"
    "HOST/$CAFqdn"
    "RPCSS/$CAName"
    "RPCSS/$CAFqdn"
)

Set-ADObject `
    -Identity $gMSA.DistinguishedName `
    -Replace @{
        "msDS-AllowedToDelegateTo" = $AllowedToDelegateTo
    }

# Enable Kerberos Protocol Transition
Set-ADAccountControl `
    -Identity $gMSA.DistinguishedName `
-TrustedToAuthForDelegation $EnableProtocolTransitionAs with CEP, I use -Add when configuring the HTTP SPNs so that any existing SPNs on gMSA_CES are preserved. The delegation configuration is different. Here we deliberately use -Replace for msDS-AllowedToDelegateTo, because we want the permitted delegation targets for the CES service to be explicitly defined and limited to the Certification Authority.
The constrained delegation configuration allows gMSA_CES to delegate to the required HOST and RPCSS services on lab-srv-02, using both the short hostname and FQDN. Finally, TrustedToAuthForDelegation enables Kerberos Protocol Transition, corresponding to Trust this user for delegation to specified services only – Use any authentication protocol. I can verify the resulting configuration with:
Get-ADServiceAccount gMSA_CES `
    -Properties ServicePrincipalName, msDS-AllowedToDelegateTo |
    Select-Object ServicePrincipalName, msDS-AllowedToDelegateTo | Format-List

Get-ADServiceAccount gMSA_CES `
    -Properties TrustedToAuthForDelegation |
Select-Object TrustedToAuthForDelegationAt this point, the CES service names, Kerberos identity and delegation configuration are aligned with the two CES endpoints.
Installing the certificate enrollment policy web service
With the prerequisites, DNS records, TLS certificates and Kerberos configuration in place, I can configure the Certificate Enrollment Policy Web Service on both CEP servers. The installation itself is largely identical to the configuration used in the previous CEP article. There is, however, one important difference: instead of using the computer’s hostname to locate the TLS certificate, I explicitly specify the DNS service name created earlier. Use this script to help with the installation:
$CepDnsName = "CEP01.corp.michaelwaterman.nl"

$Cert = Get-ChildItem -Path "Cert:\LocalMachine\My" |
    Where-Object {
        $_.DnsNameList.Unicode -contains $CepDnsName -and
        $_.HasPrivateKey -and
        $_.NotBefore -le (Get-Date) -and
        $_.NotAfter  -gt (Get-Date) -and
        $_.EnhancedKeyUsageList.ObjectId -contains "1.3.6.1.5.5.7.3.1"
    } |
    Sort-Object NotAfter -Descending |
    Select-Object -First 1

if (-not $Cert) {
    throw "No valid TLS certificate for '$CepDnsName' was found in Cert:\LocalMachine\My."
}

Write-Host "Using TLS certificate:" -ForegroundColor Cyan
$Cert | Format-List Subject, Thumbprint, NotAfter, HasPrivateKey

$CepConfigurationParameters = @{
    AuthenticationType = "Kerberos"
    SSLCertThumbprint   = $Cert.Thumbprint
    Force               = $true
}

Install-AdcsEnrollmentPolicyWebService @CepConfigurationParametersThe script searches the Local Computer certificate store for a valid TLS certificate containing the specified DNS name. It additionally verifies that the certificate has a private key, is currently valid and contains the Server Authentication EKU. Once a suitable certificate is found, its thumbprint is supplied to Install-AdcsEnrollmentPolicyWebService and the CEP instance is configured using Kerberos authentication. Run the script on both CEP servers, changing only the $CepDnsName variable.
Updating the CEP service configuration
The CEP installation automatically configures its IIS application using the hostname of the server on which it was installed. In my environment, however, clients should access the services using the dedicated CEP01 and CEP02 DNS names created earlier. I therefore need to update two Application Settings of the ADPolicyProvider_CEP_Kerberos IIS application:
- FriendlyName, a recognizable name presented for the policy service.
- URI, the URL through which clients access the CEP endpoint.
I will use Corp Enrollment Policy as the Friendly Name on both servers, while the URI will contain the individual DNS name of each CEP server. The configuration can be changed directly through the IIS PowerShell provider:
Import-Module WebAdministration

$CepDnsName   = "CEP01.corp.michaelwaterman.nl"
$FriendlyName = "Corp Enrollment Policy"

$ApplicationPath = "IIS:\Sites\Default Web Site\ADPolicyProvider_CEP_Kerberos"

$NewUri = "https://$CepDnsName/ADPolicyProvider_CEP_Kerberos/service.svc/CEP"

Set-WebConfigurationProperty `
    -PSPath $ApplicationPath `
    -Filter "appSettings/add[@key='FriendlyName']" `
    -Name "value" `
    -Value $FriendlyName

Set-WebConfigurationProperty `
    -PSPath $ApplicationPath `
    -Filter "appSettings/add[@key='URI']" `
    -Name "value" `
-Value $NewUriRun the script on both CEP servers, changing only $CepDnsName.
Installing the certificate enrollment web service
With the CEP servers configured, I can now install the Certificate Enrollment Web Service on the two CES servers. As with CEP, the installation follows the configuration from the previous CES article. The main difference is that we no longer derive the TLS certificate name from the computer’s hostname. Instead, we explicitly specify the dedicated CES DNS name created earlier. The script searches the Local Computer certificate store for a valid TLS certificate containing the specified CES DNS name. It verifies that the certificate has a private key, is currently valid, and contains the Server Authentication EKU. The Certification Authority is configured separately using its FQDN and CA Common Name. The resulting values, together with the TLS certificate thumbprint, are then passed to Install-AdcsEnrollmentWebService. Kerberos is used for authentication and the CES application is configured to use the application pool identity.
$CesDnsName = "CES01.corp.michaelwaterman.nl"

$CAServerFqdn = "lab-srv-02.corp.michaelwaterman.nl"
$CACommonName = "Corp-Enterprise-CA"
$CAConfig     = "$CAServerFqdn\$CACommonName"

$Cert = Get-ChildItem -Path "Cert:\LocalMachine\My" |
    Where-Object {
        $_.DnsNameList.Unicode -contains $CesDnsName -and
        $_.HasPrivateKey -and
        $_.NotBefore -le (Get-Date) -and
        $_.NotAfter  -gt (Get-Date) -and
        $_.EnhancedKeyUsageList.ObjectId -contains "1.3.6.1.5.5.7.3.1"
    } |
    Sort-Object NotAfter -Descending |
    Select-Object -First 1

if (-not $Cert) {
    throw "No valid TLS certificate for '$CesDnsName' was found in Cert:\LocalMachine\My."
}

Write-Host "Using TLS certificate:" -ForegroundColor Cyan
$Cert | Format-List Subject, Thumbprint, NotAfter, HasPrivateKey

$CesConfigurationParameters = @{
    CAConfig                = $CAConfig
    AuthenticationType      = "Kerberos"
    SSLCertThumbprint       = $Cert.Thumbprint
    ApplicationPoolIdentity = $true
    Force                   = $true
}

Install-AdcsEnrollmentWebService @CesConfigurationParametersRun the script on both CES servers, changing only the $CesDnsName variable.
Updating the CES service configuration
Just like CEP, the CES installation initially configures its service URI using the hostname of the underlying server. Since clients in my lab will access the services through the dedicated CES01 and CES02 DNS names, we need to update the IIS application configuration accordingly. The CES application stores its service URI in the Application Settings of the CES_Kerberos IIS application. I can update this directly through the IIS PowerShell provider.
Import-Module WebAdministration

$CesDnsName = "CES01.corp.michaelwaterman.nl"

$ApplicationPath = "IIS:\Sites\Default Web Site\Corp-Enterprise-CA_CES_Kerberos"

$NewUri = "https://$CesDnsName/CES_Kerberos/service.svc/CES"

Set-WebConfigurationProperty `
    -PSPath $ApplicationPath `
    -Filter "appSettings/add[@key='URI']" `
    -Name "value" `
-Value $NewUriRun the configuration on both CES servers.
Configuring the IIS application pool identities
With the CEP and CES services installed, the next step is to configure their IIS application pools to run under the Group Managed Service Accounts (gMSAs) prepared earlier. I already covered the complete gMSA and IIS application pool configuration in the previous CEP and CES articles, so I will not repeat those steps here. Apply the same configuration to all four servers:
| Server | Service | Application Pool Identity |
|---|---|---|
lab-srv-03 | CEP01 | CORP\gMSA_CEP$ |
lab-srv-04 | CEP02 | CORP\gMSA_CEP$ |
lab-srv-05 | CES01 | CORP\gMSA_CES$ |
lab-srv-06 | CES02 | CORP\gMSA_CES$ |
Both CEP application pools therefore use the same gMSA_CEP identity, while both CES application pools use gMSA_CES. Follow the procedure from the previous articles to configure the IIS application pool identity, including the required gMSA settings and application pool restart.
Configuring the CES enrollment server endpoints
With both CES servers installed and configured, I now need to make both endpoints available through the enrollment policy returned to the clients. The available CES endpoints are stored in the multi-valued msPKI-Enrollment-Servers attribute on the Certification Authority object in Active Directory. We discussed this attribute and its structure in part 4 of this series. For this configuration, we want CEP to advertise both CES endpoints. Both CES servers use Kerberos authentication and, at this stage, I deliberately configure them with the same priority. This will allow us to examine how Windows selects between equally preferred enrollment endpoints later in this article. I can update the msPKI-Enrollment-Servers attribute using the Active Directory PowerShell module:
Import-Module ActiveDirectory

$CAName = "Corp-Enterprise-CA"

$ConfigNC = (Get-ADRootDSE).configurationNamingContext
$EnrollmentServicesPath = "CN=Enrollment Services,CN=Public Key Services,CN=Services,$ConfigNC"

# Find the CA object
$CA = Get-ADObject `
    -SearchBase $EnrollmentServicesPath `
    -Filter "Name -eq '$CAName'" `
    -Properties msPKI-Enrollment-Servers

if (-not $CA) {
    throw "Certification Authority '$CAName' was not found in Active Directory."
}

# Read the existing CES configuration
[string[]]$CurrentEnrollmentServers = $CA.'msPKI-Enrollment-Servers'

# Replace only the server names
[string[]]$NewEnrollmentServers = $CurrentEnrollmentServers |
    ForEach-Object {
        $_ `
            -replace "lab-srv-05\.corp\.michaelwaterman\.nl", "CES01.corp.michaelwaterman.nl" `
            -replace "lab-srv-06\.corp\.michaelwaterman\.nl", "CES02.corp.michaelwaterman.nl"
    }

# Write the modified values back to Active Directory
Set-ADObject `
    -Identity $CA.DistinguishedName `
    -Replace @{
        "msPKI-Enrollment-Servers" = $NewEnrollmentServers
}Note: The equal priority is intentional. Later in this article, I will test what happens when both endpoints are available and, more importantly, what happens when one of them becomes unavailable. This will expose some interesting behavior in the native Windows endpoint selection mechanism.
Configuring the CEP endpoints through group policy
With both CEP and CES services configured, I can now make the enrollment policy available to the domain clients. In Part 4 of this series, I’ve configured the Certificate Enrollment Policy through Group Policy and demonstrated how domain-joined clients discover and use a CEP endpoint. The procedure remains the same, so we will not repeat all configuration steps here. Create or modify a Group Policy Object as described in Part 4 and configure the Certificate Services Client – Certificate Enrollment Policy settings. This time, however, add both CEP endpoints to the policy:
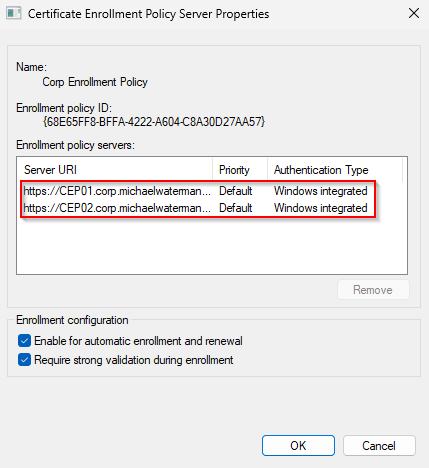
Configure both policy servers to use Windows Integrated Authentication. For the initial testing, both CEP servers should be configured with the same priority. This is intentional, I want Windows to perform its native selection between the available policy servers before introducing failures and examining the resulting behavior.
Once the GPO has been linked to the appropriate clients, update Group Policy with gpupdate /force. At this point, the clients know about the two CEP endpoints. In the next blog, we can start validating the configuration and see how Windows actually behaves when multiple policy servers are available.
What’s next?
At this point, the redundant CEP and CES environment is ready. I have two CEP servers, two CES servers, Kerberos authentication, dedicated DNS names, and multiple endpoints available to the clients. But redundancy does not automatically mean high availability, or does it? (insert dramatic music at this point).
In the next article, I will put this configuration to the test. I’ll examine how Windows selects between multiple CEP and CES endpoints, what happens when services become unavailable, and how priority affects the failover behavior.
Time to stop configuring and start breaking things. Until we meet again!
Leave a Reply