In the previous parts of this series, I’ve looked at the architecture behind Microsoft Certificate Enrollment Services and built both the Certificate Enrollment Policy Web Service (CEP) and Certificate Enrollment Web Service (CES). At this point, all the server-side components are in place. But having a working CEP and CES infrastructure is only half the story. Ultimately, a client needs to know where to retrieve certificate enrollment policy, determine which certificate templates it is allowed to use, discover the appropriate enrollment service, and finally submit a certificate request. That’s what I will show you in this part.
I will configure Windows clients to use our CEP service in two different ways. First, I will use Group Policy, which is the obvious choice for centrally managed domain-joined systems. After that, I will configure the enrollment policy locally, which is useful for individual systems and becomes particularly interesting when working with devices that cannot rely on Active Directory Group Policy. I will then follow the complete process from policy discovery to certificate enrollment and look at what Windows is actually doing behind the scenes.
By the end of this article, the infrastructure I built in the previous parts will finally be used for what it was designed to do, “issue certificates.“.
Microsoft Certificate Enrollment Services series
This article is part of a series covering Microsoft Certificate Enrollment Services from architecture and deployment to high availability and troubleshooting.
- Part 1 – Understanding the Architecture
- Part 2 – Installing the Certificate Enrollment Policy Web Service (CEP)
- Part 3 – Installing the Certificate Enrollment Web Service (CES)
- Part 4 – Using Certificate Enrollment Services in Practice
- Part 5 – Building a Highly Available CEP/CES Infrastructure
In this article, I’ll build upon the environment created in Part 2 and Part 3. Before continuing, ensure that both the Certificate Enrollment Policy Web Service (CEP) and Certificate Enrollment Web Service (CES) are fully operational and that you have a functioning Enterprise Certification Authority (CA) available. For this walkthrough, the following lab environment is used:
| Server | Role |
|---|---|
| lab-dc-01 | Active Directory Domain Controller |
| lab-srv-02 | Enterprise Certification Authority |
| lab-srv-01 | IIS Certificate Distribution Point (CDP/AIA) |
| lab-srv-03 | Certificate Enrollment Policy (CEP) Server |
| lab-srv-04 | Certificate Enrollment Web Service (CES) Server |
| lab-srv-10 | Offline Root Certification Authority |
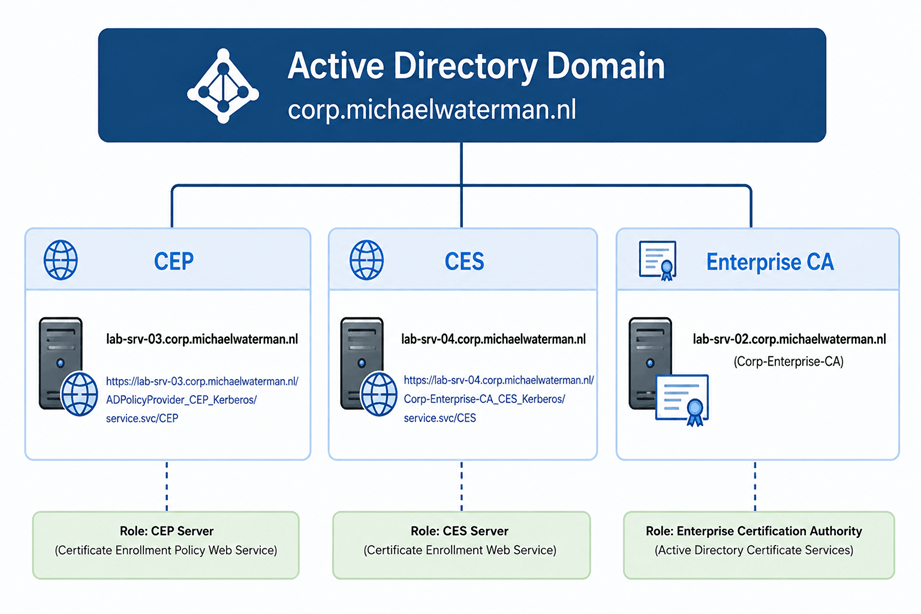
The exact URLs depend on the authentication method selected during installation. For example, a Kerberos-enabled CEP endpoint typically looks similar to:
https://lab-srv-03.corp.michaelwaterman.nl/ADPolicyProvider_CEP_Kerberos/service.svc/CEPNote! To obtain the URL, open Internet Information Services (IIS) Manager on the CEP server and navigate to:
IIS Manager
 └─ lab-srv-03
    └─ Sites
       └─ Default Web Site
          └─ ADPolicyProvider_CEP_Kerberos
             └─ Application Settings
                └─ URI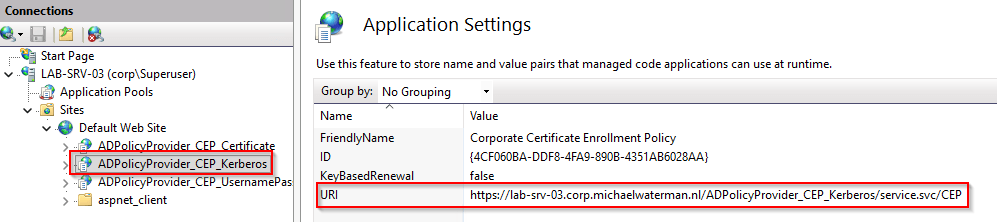
The URL for the CES service can be found on a similar location on the CES server itself.
A small note on the CEP ID property
When configuring the Certificate Enrollment Policy Web Service, you may notice the ID property. By default, CEP uses the GUID associated with the Active Directory Enrollment Policy for the domain. In my lab environment, that ID is: “{4CF060BA-DDF8-4FA9-890B-4351AB6028AA}“. Do not copy this value when building your own environment. The default Active Directory Enrollment Policy ID is specific to the domain and will therefore be different in another environment. The ID is used by Windows to uniquely identify the enrollment policy. If you want to assign a separate identity to your CEP policy, you can replace the default value with your own GUID. A new GUID can easily be generated using PowerShell:
New-GuidThis newly generated GUID can then be entered in the ID field when configuring the CEP service.
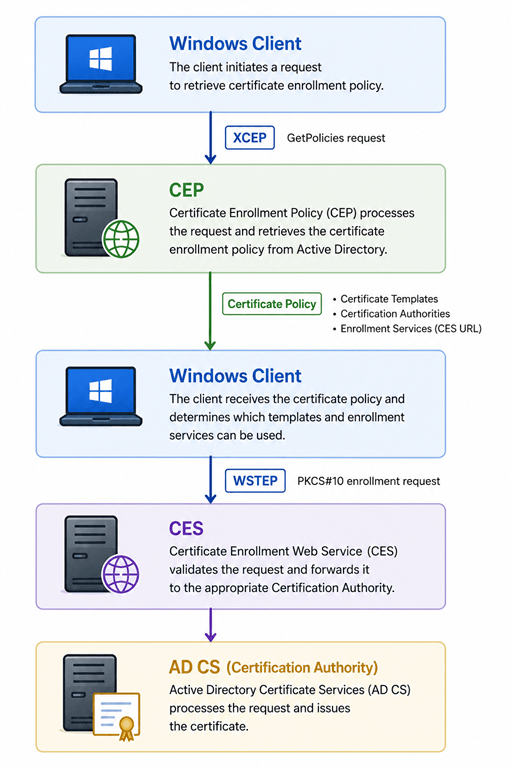
One important thing to remember from the previous articles is that the client normally does not need to be manually configured with the CES URL. Instead, the client is configured with a CEP policy server. CEP subsequently provides the client with the certificate enrollment policy, including information about the available certificate templates, certification authorities and enrollment services. Conceptually:
This difference between the two becomes important when you start configuring the clients, let’s dive into that.
Configuring CEP using group policy
For domain-joined Windows computers, Group Policy is probably the most logical way to distribute the CEP configuration. Instead of configuring every computer individually, I can publish the enrollment policy server centrally. Create or edit a Group Policy Object that applies to the computers that should use CEP. Navigate to:
Computer Configuration
 └─ Policies
    └─ Windows Settings
       └─ Security Settings
          └─ Public Key Policies
└─ Certificate Services Client - Certificate Enrollment PolicyOpen “Certificate Services Client – Certificate Enrollment Policy”. By default, a domain-joined Windows computer already has access to the Active Directory Enrollment Policy. I can now add the CEP endpoint as an additional enrollment policy server. Select the “Active Directory Enrollment Policy” and click “Remove“, select “Yes” on the “Confirm Enrollment Policy Removal” dialog screen.
Now click “Add“, enter the entire URI from the “Certificate Enrollment Policy Web Service“. From my example server that would be:
https://lab-srv-03.corp.michaelwaterman.nl/ADPolicyProvider_CEP_Kerberos/service.svc/CEPMake sure that “Authentication type:” is set to “Windows Integrated“. Click “Validate Server“. Windows will contact the CEP service and validate that the policy endpoint can be used. The resulting message should say:
The URI "https://lab-srv-03.corp.michaelwaterman.nl/ADPolicyProvider_CEP_Kerberos/service.svc/CEP" was validated successfully.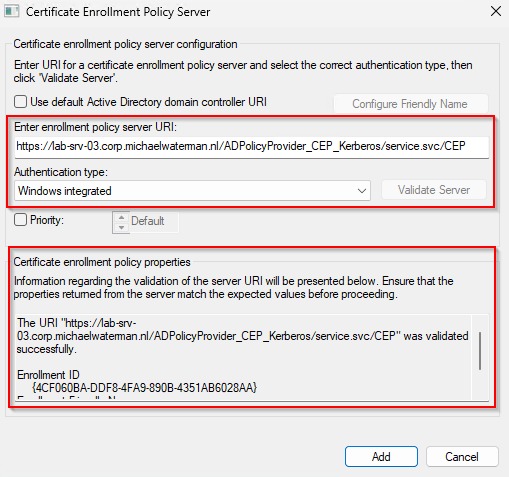
Click “Add“. The Friendly name I configured in part 2 of this series is now listed as the name of the policy.
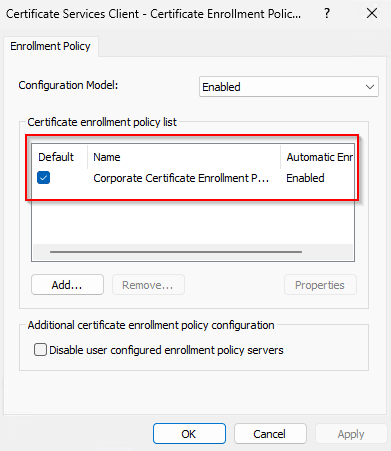
Check the selection box under “Default” and click “OK“. Once successfully added, the CEP service becomes available as a certificate enrollment policy provider on systems receiving this Group Policy. After applying the policy, force a Group Policy refresh if you do not want to wait for the normal refresh interval. Needless to say that “Username / Password” or “Certificate” enrollment policies follow the same procedure.
Verifying the enrollment policy configuration
You do not have to trust the GUI, Windows provides a PowerShell cmdlet that allows you to inspect the enrollment policy servers known to the client:
Get-CertificateEnrollmentPolicyServer `
    -Context Machine `
-Scope AllA configured CEP endpoint should result in output similar to:
Id : {4CF060BA-DDF8-4FA9-890B-4351AB6028AA}
Url : https://lab-srv-03.corp.michaelwaterman.nl/ADPolicyProvider_CEP_Kerberos/service.svc/CEP
AuthType : Kerberos
RequireStrongValidation : True
AutoEnrollmentEnabled : True
IsDefault : True
Priority : 2147483645
Context : MachineThere are several interesting properties here.
Urlis the XCEP endpoint the client will contact to retrieve certificate enrollment policy.AuthTypetells us how the client authenticates against CEP. In this example that is Kerberos.Contextdetermines whether this policy server applies to the computer or user certificate context.AutoEnrollmentEnableddetermines whether the policy server can participate in automatic certificate enrollment.- And
Prioritybecomes particularly interesting when multiple policy servers are configured.
I’m deliberately not going too far down that rabbit hole yet. As I discovered while testing multiple CEP and CES servers for this series, endpoint selection and failover contain some interesting behaviour of their own. More on that in the next article.
What did I actually configure?
This is worth stopping at for a moment. I have not configured CES on the client. All I have told Windows is: “This is where you can retrieve certificate enrollment policy“. The client contacts CEP using XCEP and receives information describing what certificate enrollment options are available. Among other things, that policy can contain:
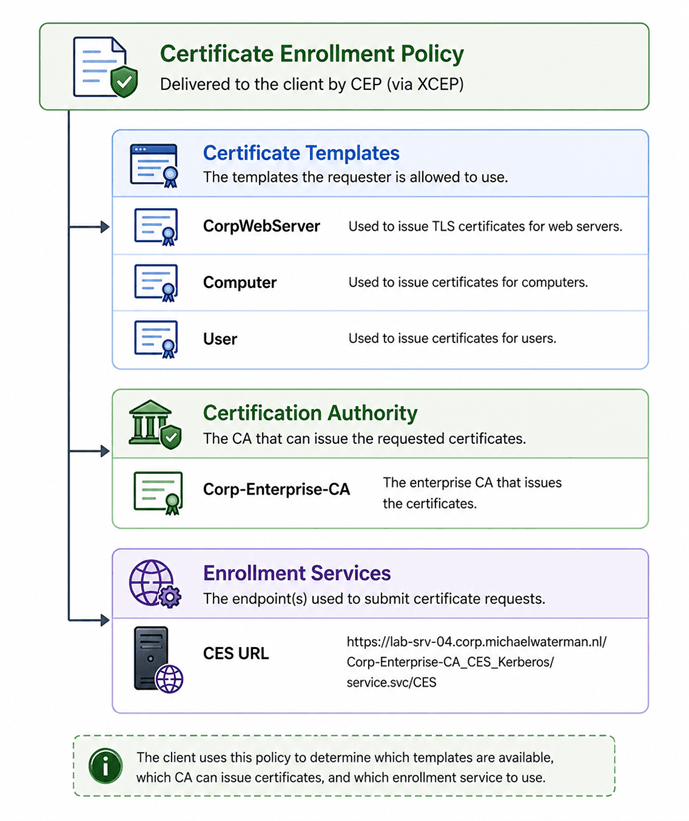
How does CEP know where CES is?
So far, I’ve configured the client with only one piece of information: the URL of the Certificate Enrollment Policy Web Service. I’ve never configured a CES URL on the client, so how does CEP know which enrollment service the client should use? When the Certificate Enrollment Web Service is configured for a Certification Authority, its enrollment endpoint is registered in Active Directory. This information is stored on the CA object in the multi-valued msPKI-Enrollment-Servers attribute that can be located here:
ADSI Edit
└─ Configuration
└─ CN=Configuration,DC=corp,DC=michaelwaterman,DC=nl
└─ CN=Services
└─ CN=Public Key Services
└─ CN=Enrollment Services
└─ CN=Corp-Enterprise-CA
└─ msPKI-Enrollment-ServersFor example, when I configured a Kerberos-authenticated CES endpoint for the Enterprise CA, Active Directory contained an entry similar to:
120https://lab-srv-04.corp.michaelwaterman.nl/Corp-Enterprise-CA_CES_Kerberos/service.svc/CES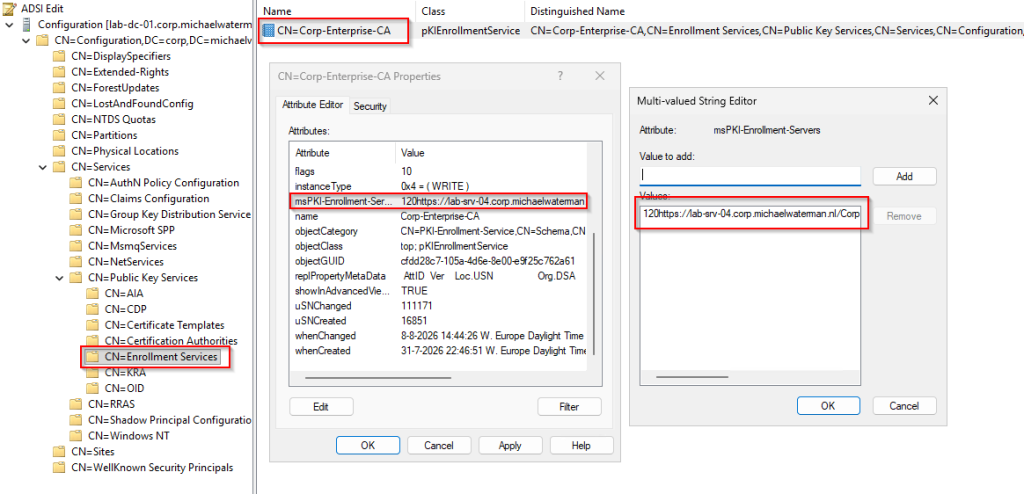
msPKI-Enrollment-ServersAt first sight, this may look like nothing more than a number followed by a URL. There is, however, more information stored in this value than you might expect. The numeric prefix describes several properties of the enrollment service:
120
││└── 0 = Enrollment and Renewal
│└─── 2 = Kerberos
└──── 1 = Priority 1In other words, the value can be read as:
[Priority][Authentication Type][Renewal Only]URLFor our example:
1 = Priority 1
2 = Kerberos authentication
0 = Normal enrollment and renewalfollowed by:
https://lab-srv-04.corp.michaelwaterman.nl/Corp-Enterprise-CA_CES_Kerberos/service.svc/CESThe authentication value is particularly useful when multiple CES authentication methods are installed. The values you will commonly encounter are:
- 2 = Kerberos
- 4 = Username/Password
- 8 = Client Certificate
This explains why you may encounter values such as:
- 120… = Priority 1, Kerberos
- 140… = Priority 1, Username/Password
- 180… = Priority 1, Client Certificate
The final digit indicates whether the endpoint can be used for normal enrollment and renewal (0) or is configured for renewal-only operation (1). You may notice that the enrollment mode appears twice: once in the msPKI-Enrollment-Servers metadata (0 or 1) and again in the CES endpoint path (CES0 or CES1). The former describes the endpoint to the enrollment policy infrastructure, while the latter identifies the corresponding CES service instance.
The priority becomes relevant when more than one CES endpoint is registered for the same CA. I’ll talk more on that behavior in much more detail in the next part of this series when I look at high availability and failover.
Managing the CES registration
You do not have to modify msPKI-Enrollment-Servers manually, Windows provides certutil to manage the enrollment service registrations associated with a Certification Authority. For example, to register the Kerberos CES endpoint with priority 1:
certutil -config "lab-srv-02.corp.michaelwaterman.nl\Corp-Enterprise-CA" `
-enrollmentServerURL "https://lab-srv-04.corp.michaelwaterman.nl/Corp-Enterprise-CA_CES_Kerberos/service.svc/CES" `
Kerberos 1Kerberos 1
│ │
│ └── Priority
│
└─────── Authentication typeIf a second CES server were registered with priority 2, for example:
certutil -config "lab-srv-02.corp.michaelwaterman.nl\Corp-Enterprise-CA" `
-enrollmentServerURL "https://ces02.corp.michaelwaterman.nl/Corp-Enterprise-CA_CES_Kerberos/service.svc/CES" `
Kerberos 2the corresponding values in msPKI-Enrollment-Servers would start with:
120https://lab-srv-04.corp.michaelwaterman.nl/Corp-Enterprise-CA_CES_Kerberos/service.svc/CES0
220https://ces01.corp.michaelwaterman.nl/Corp-Enterprise-CA_CES_Kerberos/service.svc/CES0
To remove an enrollment service registration, specify the same URL followed by delete:
certutil -config "lab-srv-02.corp.michaelwaterman.nl\Corp-Enterprise-CA" `
-enrollmentServerURL "https://lab-srv-04.corp.michaelwaterman.nl/Corp-Enterprise-CA_CES_Kerberos/service.svc/CES" `
deleteand, for the second endpoint:
certutil -config "lab-srv-02.corp.michaelwaterman.nl\Corp-Enterprise-CA" `
-enrollmentServerURL "https://ces01.corp.michaelwaterman.nl/Corp-Enterprise-CA_CES_Kerberos/service.svc/CES" `
deleteThis registration is important because it is how the enrollment infrastructure connects the two halves of the process. The client knows CEP and CEP provides the certificate enrollment policy, which includes the appropriate CES endpoint. The client can then use that endpoint to submit its certificate request. The client therefore does not need to know the CES URL beforehand. CEP tells it where to go. And that is one of the fundamental ideas behind separating certificate policy retrieval from certificate enrollment.
Configuring CEP locally
Group Policy works beautifully for domain-joined Windows systems, but it is not always available. You may have a standalone server, a workgroup computer, a system in another administrative domain, or simply a machine on which you want to test CEP without modifying Group Policy. Windows therefore also allows an enrollment policy server to be registered locally.
PowerShell gives us the Add-CertificateEnrollmentPolicyServer cmdlet for this purpose. For a Kerberos endpoint, for example:
$CepUrl = "https://lab-srv-03.corp.michaelwaterman.nl/" +
"ADPolicyProvider_CEP_Kerberos/service.svc/CEP"
Add-CertificateEnrollmentPolicyServer `
-Url $CepUrl `
-Context MachineOnce registered, I can again verify the result:
Get-CertificateEnrollmentPolicyServer `
    -Context Machine `
-Scope AllAnd this is where things become particularly useful, the mechanism Windows uses to consume CEP does not fundamentally require the CEP configuration itself to originate from Group Policy, the policy server can be configured locally.
Obviously you could also use the UI to configure the enrollment policy. Open up “certlm.msc“. Go to “Personal -> All Tasks -> Advanced Operations -> Manage Enrollment Policies“. You will be greeted by the same interface as with using centralized Group Policies. That must feel familiar by now, just use the same steps as I used above.
Note! If you’re running into the message “The URI entered above already exists.“, you should change the “ID” property on the CEP server. See the explanation at the beginning of this blog post.
Requesting a certificate
Now for the fun part, Open the local computer certificate store (certlm.msc), Navigate to: “Personal -> Certificates“. Right-click and select, “All Tasks
-> Request New Certificate“, The Certificate Enrollment wizard starts. At the policy selection stage, Windows can now use the CEP service I configured earlier.
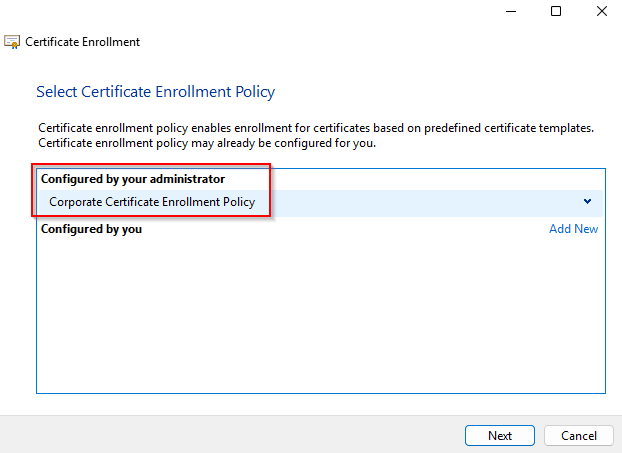
Or by using the build-in PowerShell cmdlet:
Get-Certificate `
    -Template "CorpWebServer" `
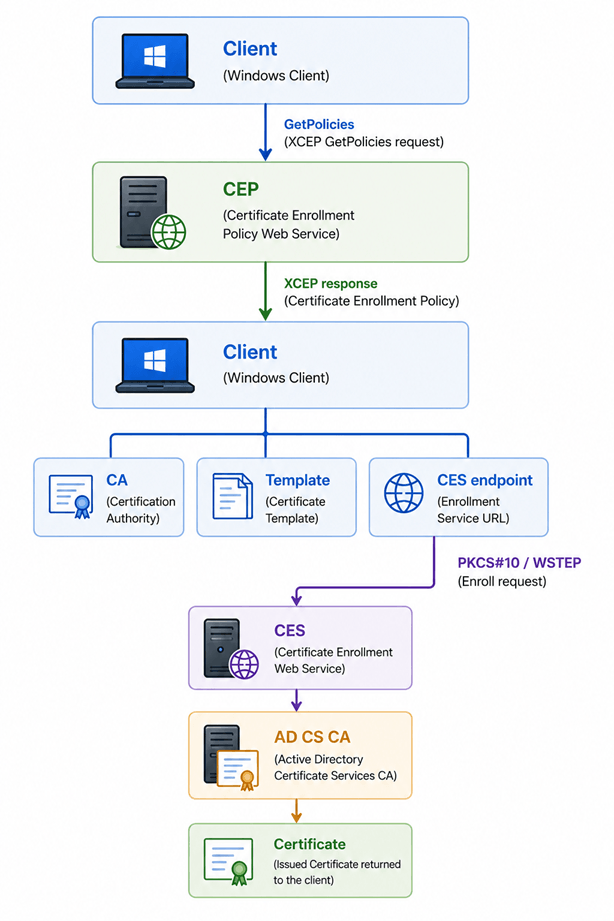
-CertStoreLocation "Cert:\LocalMachine\My"Behind that innocent-looking wizard page or the PowerShell request, quite a bit is happening. Windows contacts CEP using XCEP. CEP returns the certificate enrollment policy. Windows evaluates which templates are applicable to the current requester. If the requester has the required permissions, the appropriate certificate template becomes visible. After selecting the template and starting enrollment, Windows uses the CES information returned through policy to submit the certificate request. So what looks like: “Request New Certificate -> Select template -> Enroll“, is actually:
And this is the point where everything from Parts 1, 2 and 3 finally comes together.
A word about policy caching
While experimenting with CEP, there is one other behavior you will almost certainly encounter: caching. Windows does not retrieve every piece of certificate policy from scratch every time you open the enrollment wizard. The client maintains a local policy cache. During troubleshooting or testing, you may therefore change something on CEP or in the certificate infrastructure and wonder why the client stubbornly continues to show the old information. Rather than manually deleting cache files, use the supported certutil mechanism:
certutil -f -PolicyServer * -PolicyCache deleteThis became particularly useful while building the lab for this series. There is also a separate caching mechanism on the CEP server itself. Clearing the client policy cache does not necessarily force the CEP server itself to immediately rediscover changes made in Active Directory. That distinction explains some otherwise rather confusing behaviour when testing changes to certificate templates and enrollment-service configuration. I will revisit this much more extensively in the final troubleshooting article. For now use “IISreset” on the CEP and CES server whenever you make a change.
Group Policy or local configuration?
At this point I have two perfectly valid ways to tell Windows where CEP lives. For centrally managed domain systems, Group Policy is the obvious choice. It gives us centralized configuration and removes the need to touch individual machines. Local policy registration is useful for systems outside that management boundary, lab scenarios and cases where enrollment configuration needs to be established independently. But regardless of how the CEP URL arrives on the client, the architecture remains the same. And that is perhaps the most important takeaway from this article:
CEP tells the client what it can request and where it can request it. CES performs the actual certificate enrollment on behalf of the client.
Verifying the enrollment path
After the certificate has been successfully enrolled, I can verify which CEP and CES endpoints were actually used during the enrollment. Windows stores additional enrollment metadata alongside the certificate in the local certificate store. This information is not part of the X.509 certificate itself, but is maintained as a Windows certificate property. To inspect all certificates in the Local Computer Personal certificate store, run:
certutil -store -v myFor a certificate enrolled through CEP and CES, look for the following property: “CERT_CEP_PROP_ID(87)“. In my lab, the property contains:
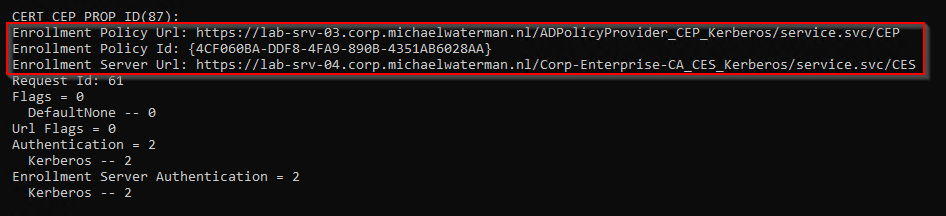
This gives me a surprisingly complete view of the enrollment path. Windows records the CEP policy URL, CES enrollment URL, CA request ID and even the authentication mechanism used for both services.
Targeting a specific certificate
Running certutil -store -v my can produce quite a lot of output when the certificate store contains many certificates. Fortunately, certutil also allows us to target a specific certificate. For example, using the certificate’s thumbprint:
certutil -store -v my ee465210ca8157db1d165ccb2714aa66d91e79a8The thumbprint can be found in the certificate properties or with PowerShell:
Get-ChildItem Cert:\LocalMachine\My |
Select-Object Subject, ThumbprintOr if you want something more fancy, you can use this code as well:
$Certificate = Get-ChildItem Cert:\LocalMachine\My |
    Where-Object Subject -eq "CN=lab-srv-09.corp.michaelwaterman.nl" |
    Sort-Object NotBefore -Descending |
    Select-Object -First 1

certutil -store -v my $Certificate.ThumbprintThis is particularly useful when troubleshooting systems with a large number of certificates.
What are you actually looking at?
There is an important distinction here. CERT_CEP_PROP_ID(87) is not an X.509 certificate extension. It is metadata associated with the certificate in the Windows certificate store. Conceptually:
Windows Certificate Store
│
├── X.509 Certificate
│   ├── Subject
│   ├── Issuer
│   ├── SAN
│   ├── EKU
│   └── Certificate Template
│
└── Windows Certificate Properties
    └── CERT_CEP_PROP_ID(87)
        ├── Enrollment Policy URL (CEP)
        ├── Enrollment Policy ID
        ├── Enrollment Server URL (CES)
        ├── Authentication
└── Request IDThis distinction is important when troubleshooting. Simply exporting the X.509 certificate does not give you the same enrollment context that is available in the Windows certificate store.
Verifying the request on the Certification Authority (CA)
You can also inspect the enrollment from the other side of the infrastructure. Open the Certification Authority console on the issuing CA and navigate to: “Certification Authority -> Corp-Enterprise-CA -> Issued Certificates“. Locate the certificate request. The easiest correlation point is the Request ID. My example client-side CERT_CEP_PROP_ID(87) showed: “Request Id: 62“. I can therefore find request 62 on the CA and inspect its properties. Right click on the certificate and choose: “All Tasks -> View Attributes/ Extensions“.
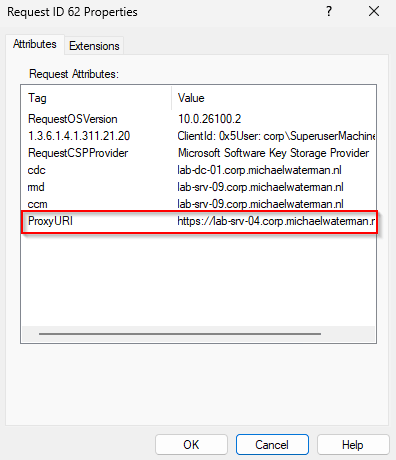
In the example above you can see that request 62 used a ProxyURI a.k.a. a CES server. You can also query the CA database directly with certutil. For example:
certutil -view -restrict "RequestID=62"Or request specific columns to keep the output manageable:
certutil -restrict "AttributeRequestID=62" -view AttribOr a little more advanced:
certutil -restrict "AttributeRequestID=62,AttributeName=ProxyURI" `
    -out "AttributeName,AttributeValue" `
    -view Attrib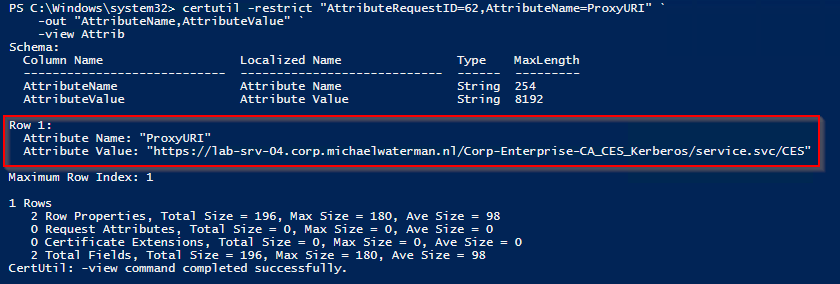
This makes the Request ID particularly valuable: it gives us a direct correlation between what the Windows client knows about the enrollment and the corresponding request stored by AD CS.
What’s next?
I now have a complete working certificate enrollment path. I’ve built CEP, I’ve built CES, configured clients to discover certificate policy, and finally, I’ve used that policy to request certificates. So naturally, the next question is:
What happens when one of those services goes down?
Microsoft Certificate Enrollment Services supports publishing multiple CEP and CES endpoints and includes client-side endpoint selection and failover logic. That sounds like High Availability, right? Let’s find out in part 5 of this series!
Until the we meet again!
The explanation of how CEP and CES work together is particularly useful, especially the fact that the client only needs to know the CEP endpoint while CEP provides the information about the appropriate enrollment service. The practical examples using Group Policy, PowerShell, and certificate verification also make the enrollment process much easier to follow.