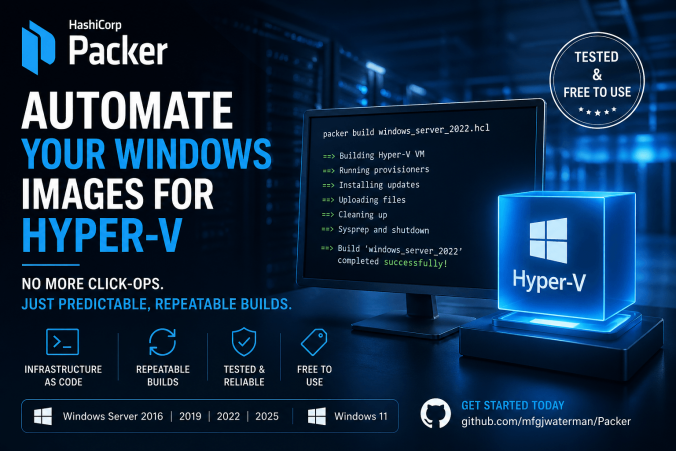
Back in December, I published a blog on building Windows images using Packer on Proxmox. That setup worked well, but like most things in infrastructure, you start tweaking, refining, and eventually rethinking parts of it. if you’re anything like me, this needs to work perfectly…. and that takes a lot of time. Over the past months, I’ve streamlined the entire workflow. Less friction, more consistency, and most importantly, something I can reuse across different Windows versions without thinking twice. And best of all, it’s now fully functional on Microsoft Hyper-V!
In this post, I’ll walk you through my current setup for building Windows Server images on Hyper-V using Packer. This is the version I actually use today as I moved back to Windows Hyper-V for my lab setup, not just something that works, but something that’s predictable and maintainable and was really fun to make.
Let’s dive in!
Project structure
One of the first things I focused on was structure. If your build process becomes hard to read, it will eventually become hard to maintain. Here’s how my project is organized, the image below represents the directory and file structure for Windows Server 2025, but the setup is exactly the same for other builds as well.
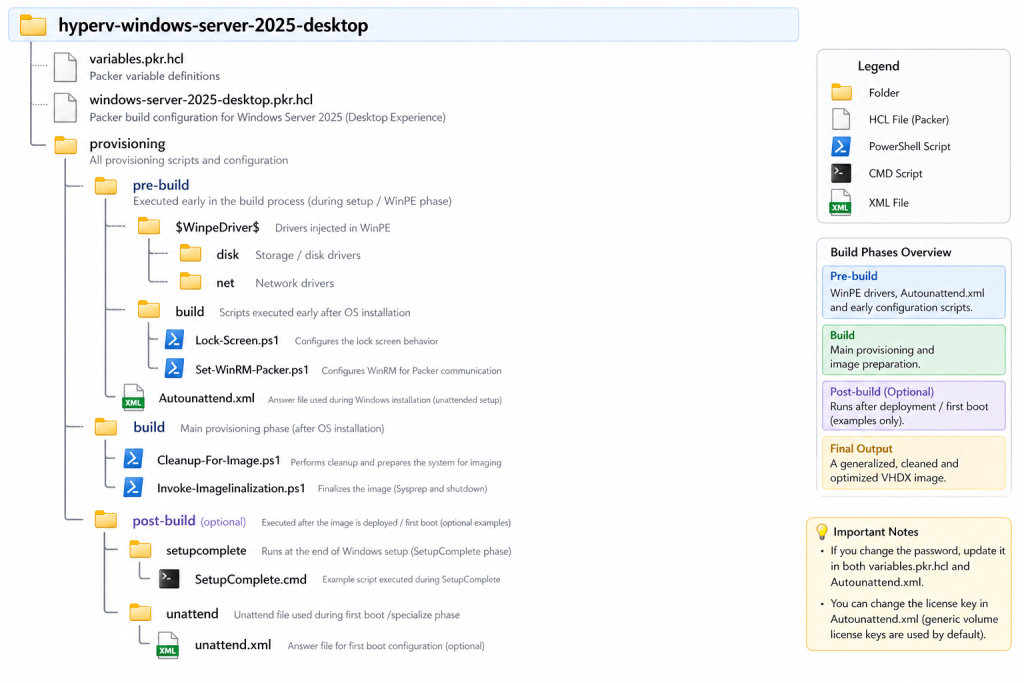
- hyperv-windows-server-2025-desktop: The root of the project. This contains everything required to build a fully automated Windows image using Packer on Hyper-V.
- variables.pkr.hcl: The variables.pkr.hcl file defines all configurable inputs for the build. This includes the virtual machine resources such as CPU, memory, and disk size, the location of the installation ISO, the network configuration, and the credentials used during provisioning. Rather than modifying the core build logic, this is the place where you adjust the behavior of your image, making it easier to reuse the same configuration across different environments or Windows versions.
- windows-server-2025-desktop.pkr.hcl: This file is the main Packer configuration and effectively drives the entire build process. It defines the Hyper-V builder, the virtual machine creation settings, and the provisioning steps that are executed during the build. In addition, it outlines the full workflow from initial boot to final image capture. In practice, this is the file that orchestrates everything, tying together all phases of the build into a single, predictable process.
- hyperv-windows-server-2025-desktop – provisioning: Contains all scripts and configuration used during the build process. The structure is split into phases for clarity and re-usability.
- hyperv-windows-server-2025-desktop – provisioning – pre-build: Everything required before or immediately after the Windows installation.
- hyperv-windows-server-2025-desktop – provisioning – pre-build – $WinpeDriver$: Drivers injected during the Windows setup (WinPE phase). (optional).
- hyperv-windows-server-2025-desktop – provisioning – pre-build – $WinpeDriver$ – disk: Storage drivers (e.g. for specific controllers).
- hyperv-windows-server-2025-desktop – provisioning – pre-build – $WinpeDriver$ – net: Network drivers to ensure connectivity during setup.
- hyperv-windows-server-2025-desktop – provisioning – pre-build – $WinpeDriver$: Drivers injected during the Windows setup (WinPE phase). (optional).
- Autounattend.xml: This file automates the Windows installation process from start to finish. It handles disk partitioning, creates the initial user account, sets the administrator password, and applies the license key during setup. By defining these steps in advance, the installation can run without any manual interaction, enabling a fully unattended deployment.
- hyperv-windows-server-2025-desktop – provisioning – pre-build – build: Scripts executed early in the process, right after installation.
- Lock-Screen.ps1: Configures lock screen behavior.
- Set-WinRM-Packer.ps1: Configures WinRM so Packer can connect to the VM. Without this, provisioning cannot continue.
- hyperv-windows-server-2025-desktop – provisioning – pre-build – build: Scripts executed early in the process, right after installation.
- hyperv-windows-server-2025-desktop – provisioning – build: The main provisioning directory after Windows is fully operational.
- Cleanup-For-Image.ps1: This script prepares the system for capture by cleaning up any unnecessary artifacts left behind during the build process. It removes temporary files, clears logs, and reduces the overall image footprint. This step is essential to ensure that the final image is clean, optimized, and suitable for use as a golden image.
- Invoke-ImageFinalization.ps1: This script represents the final step before the image is captured. It resets the WinRM configuration to a default state, removes any remaining Packer-related artifacts, and then initiates Sysprep to generalize the system. Once completed, the virtual machine is shut down, leaving behind a clean and reusable image ready for deployment.
- hyperv-windows-server-2025-desktop – provisioning – post-build: Optional directory and phase used after deployment. Included as an example.
- hyperv-windows-server-2025-desktop – provisioning – post-build – setupcomplete & SetupComplete.cmd: Executed at the end of Windows setup. Useful for final tweaks or installations.
- hyperv-windows-server-2025-desktop – provisioning – post-build – unattend & unattend.xml: Used during first boot (specialize phase). Allows additional post-install configuration.
- hyperv-windows-server-2025-desktop – provisioning – pre-build: Everything required before or immediately after the Windows installation.
Some important notes
- Changing the password?
You must update it in:variables.pkr.hclAutounattend.xml
- Changing the license key?
Modify it inAutounattend.xml(generic volume license keys are used by default) - Using a custom unattend during shutdown?
This can be configured in theshutdown_commandinside the.pkr.hclfile. Add “-UnattendPath C:\Windows\System32\Sysprep\Unattend.xml” as an example to the “shutdown_command” in the hcl file. This should be added, straight after “-TargetRole Server“. - Deploying a client system?
In the same file and location as mentioned above change the “-TargetRole Server” to “-TargetRole Client“. This will disable WinRM from starting up as is the default on Windows client systems (e.g. Windows 11).
Variables overview
Before you open up that elevated command prompt or PowerShell and run “Packer build .“, you should first configure the variables specific for your environment. Like I said in the previous chapter, the variables file is where it all begins, this is where you add your first customization’s, think of it as the control panel for your build. Anywhere you see the word <replace>, you’re expected to fill in your own value.
iso_url
Specifies the location of the Windows installation ISO. This can be a local path or a remote URL depending on your setup. (e.g. “D:/ISO/windows.iso“)iso_checksum
Defines the checksum of the ISO file. Used by Packer to verify the integrity of the image before starting the build. Use “Get-FileHash” to obtain the hash of the ISO file. (e.g. “sha256:…”)build_directory
Temporary working directory used during the build process. This is where intermediate files and artifacts are stored. (e.g. “D:/Build“)output_directory
Final destination for the generated image (VHDX). This is the location where your reusable image will be stored after the build completes. E.G. “D:/Templates“switch_name
Name of the Hyper-V virtual switch used to provide network connectivity to the build VM.vm_description
Optional description assigned to the virtual machine. Useful for identification and documentation purposes.vm_os
Defines the operating system type. In this case set to"windows"and typically not changed.vm_os_sku
Specifies the OS SKU (for example: Standard or Datacenter). Used for identification and naming consistency.vm_os_version
Defines the Windows version being built (e.g. 2022, 2025). Helps keep builds structured and predictable.vm_os_edition
Indicates the edition type, such as Desktop Experience or Core.build_version
Version identifier for the image itself. Useful for versioning your templates (e.g. v1.0, v1.1).winrm_username
Username used by Packer to connect to the VM over WinRM. Defaults toAdministrator.winrm_password
Password for the WinRM connection. Marked as sensitive and must match the password defined inAutounattend.xml.memory
Amount of RAM (in MB) assigned to the VM during the build process.cpus
Number of virtual CPUs assigned to the VM.disk_size
Size of the virtual disk in MB. Determines how large the resulting VHDX will be.
The build workflow
All of the build logic lives in the windows-server-2025-desktop.pkr.hcl file. One of the biggest advantages of this setup is that the workflow itself is identical across different Windows versions. Whether you’re building windows-server-2025-desktop, windows-server-2022-desktop, or a future release, the only thing that really changes is the name and the source media. Everything else remains consistent, which makes the entire process predictable and easy to maintain.
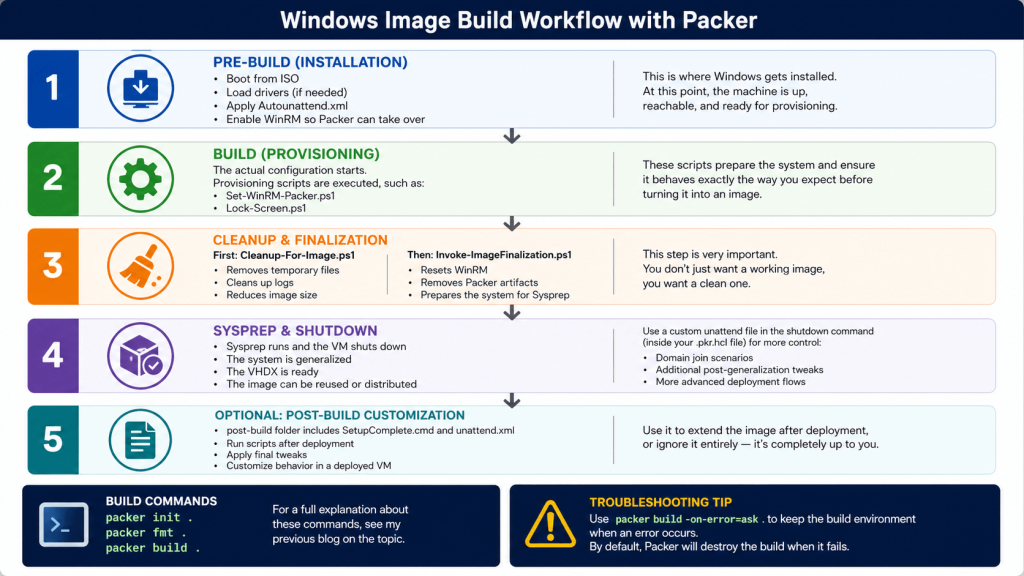
Once everything is in place, running the build is straightforward. You start by initializing the project with packer init ., followed by packer fmt . to ensure the configuration is properly formatted. Finally, you execute packer build . to start the actual build process. If you’re looking for a more detailed explanation of these commands, I’ve covered them in my previous blog on the topic.
When troubleshooting, it’s worth using packer build -on-error=ask .. By default, Packer will clean up and destroy the virtual machine when something goes wrong, which can make it difficult to investigate issues. Using this option allows you to retain access to the build environment, giving you the opportunity to inspect the system and identify what went wrong before it is discarded.
Step 1 – Pre-build (Installation)
The process starts in the pre-build phase, which is where the foundation of the image is created. At this stage, the virtual machine boots from the Windows installation ISO and begins the setup process. If required, additional drivers are loaded during this phase to ensure that storage and network components are available from the start.
The installation itself is fully automated through the use of the Autounattend.xml file. This file takes care of the initial configuration, allowing Windows to install without any manual interaction. As part of this setup, WinRM is also enabled, which is a critical step because it allows Packer to establish a connection to the system once the installation is complete.
By the end of this phase, the machine is fully installed, accessible over the network, and ready for the next stage: provisioning.
Step 2 – Build (provisioning)
Once the system is up and running, the build phase begins. This is where the actual configuration takes place and the image starts to take shape. During this stage, a set of provisioning scripts is executed to prepare the system for its final role.
Scripts such as Set-WinRM-Packer.ps1 and Lock-Screen.ps1 are used to apply specific configurations and ensure the system behaves consistently (read, nobody can interfere with the deployment ). This isn’t about heavy customization, but rather about setting a predictable baseline. The goal is to make sure that everything is configured exactly the way you expect before turning the system into a reusable image.
By keeping this phase focused and controlled, it becomes much easier to maintain consistency across builds and avoid unexpected behavior later on.
Step 3 – Cleanup & finalization
The cleanup and finalization phase is where things start to matter the most, and at the same time, where steps are often skipped. This is the point where you decide whether your image is just functional, or actually clean and reusable.
The process starts with the Cleanup-For-Image.ps1 script, which removes temporary files, clears logs, and reduces the overall image size. It strips away everything that was needed during the build, but shouldn’t be part of the final image. This helps keep the image lean and avoids carrying unnecessary artifacts into every future deployment.
Once the system is cleaned up, the Invoke-ImageFinalization.ps1 script takes over. This script resets the WinRM configuration back to a default state, removes any remaining Packer-related artifacts, and prepares the system for Sysprep. At this stage, the machine is effectively being detached from the build process and readied for reuse.
This phase is critical. You’re not just aiming for an image that works, but for one that is consistent, predictable, and free from anything that could cause issues later on.
Step 4 – Sysprep & shutdown
Finally, Sysprep is executed and the virtual machine shuts down. At this point, the system has been fully generalized, meaning it is stripped of any environment-specific information and ready to be reused. The resulting VHDX is now in a clean state and can be stored, distributed, or used as the foundation for future deployments.
If you need more control over this final stage, you can define a custom unattend file directly in the shutdown command within your .pkr.hcl file. This gives you the flexibility to extend the process beyond standard generalization. For example, you might use this to prepare for domain join scenarios, apply additional post-generalization configurations, or support more advanced deployment workflows.
This final step effectively transitions the system from a build artifact into a reusable, production-ready image.
Step5 – Optional: Post-build customization
The post-build phase is entirely optional, but included as a reference for those who want to extend the image beyond the standard build process. The post-build folder contains example files such as SetupComplete.cmd and an additional unattend.xml, which can be used to perform actions after the system has been deployed.
This stage allows you to run scripts after installation, apply final tweaks, or further customize the behavior of the virtual machine in its deployed state. It can be useful for scenarios where certain configurations should only be applied after the system has gone through its first boot or specialization phase.
At the same time, this layer is not required. The base image produced by the build process is already clean and reusable on its own. Whether you use this phase or not depends entirely on your own workflow and how much post-deployment customization you need.
AutomatedLab ISO files
For lab environments, and especially when working with AutomatedLab, I created a small PowerShell helper script that converts the generated VHDX into a bootable ISO. This allows you to continuously reuse your latest Packer builds without having to rely on static installation media. In practice, this means your lab environments can always be based on up-to-date, pre-configured images. Below is an example of how the script can be used:
.\New-WindowsIsoFromVhdx.ps1 `
  -VhdxPath "E:\VM Templates\template-windows-server-2025-desktop-v1.1\Virtual Hard Disks\build-windows-server-2025-desktop-v1.1.vhdx" `
  -SourceIsoPath "E:\ISO\Microsoft\Windows Server\Windows Server 2025\Windows Server 2025 - EN-US - VL.iso" `
  -OutputIsoPath "C:\LabSources\ISOs\Windows_Server_2025_Desktop.iso" `
  -StagingPath "C:\Staging" `
  -WorkPath "C:\Work" `
  -ImageName "Windows Server 2025 Standard (Desktop Experience)" `
  -ImageDescription "Windows Server 2025 Standard (Desktop Experience) captured from Hyper-V Packer image" `
-Compression MaxThe script is available via my GitHub repository and is designed to be simple to use while still offering flexibility where needed. It integrates nicely into existing lab workflows and makes it easy to standardize deployments.
-VhdxPath
Path to the VHDX file generated by Packer. This is the image that will be captured and converted.-SourceIsoPath
Path to the original Windows installation ISO. Used as a base to rebuild a bootable ISO.-OutputIsoPath
Destination path for the newly created ISO file.-StagingPath
Temporary working directory where files are extracted and prepared during the process.-WorkPath
Additional workspace used during image manipulation and ISO creation.-ImageName
Name of the image as it will appear inside the ISO (e.g. in Windows Setup). This will need to match the original name of the image for AutomatedLab to recognize the build.-ImageDescription
Description of the image, useful for identification when multiple images are present.-Compression
Specifies the compression level for the image inside the ISO (e.g.Maxfor smallest size).
If you want some examples that I use for my lab build, I’ve got a couple on my GitHub as well (of course I do)
Final thoughts
What started as a small side project quickly turned into something I genuinely enjoyed building. Even though this isn’t my primary area of focus, there’s something satisfying about taking a messy, manual process and turning it into something structured, repeatable, and just… clean. Along the way, this setup evolved through quite a bit of trial and error. More than I’d like to admit, actually. But that’s also where most of the value came from, figuring out what works, what breaks, and what’s simply not worth the effort.
If there’s one thing I hope this blog achieves, it’s that you don’t have to go through that same process all over again. The many hours I put into this weren’t entirely painless, but if it saves you from retracing those exact steps, then it was definitely worth it.
And who knows, you might even end up enjoying it as much as I did. Until next time!
Leave a Reply