If you’re running Active Directory, like I said in a previous blog, that’s the majority of readers, you’re almost certainly using LDAPS, the secure version of LDAP. Not just because it’s “best practice,” but because plaintext LDAP over port 389 is a really bad idea, furthermore Microsoft has blocked access when you’re trying to connect to just LDAP on port 389 without any form of security.
While Microsoft has not removed the ability to use LDAP on port 389, recent security hardening features (such as LDAP channel binding and LDAP signing) can be configured to reject simple bind operations that are not signed or encrypted. In practice, many organizations today do not support clear-text LDAP unless it is secured (for example, via LDAPS). That’s why enabling LDAPS and proper security policies is highly recommended.
Unfortunately most environments treat LDAPS like a checkbox: “Yeah, we enabled LDAPS, installed a certificate, moved on.”
And that’s fine… until it isn’t. If your LDAP clients, VPN gateways, firewalls, RADIUS/NPS servers, Linux services, identity proxies, SaaS connectors, security appliances (the list goes on) depend on LDAPS, then what happens when the one Domain Controller you pointed them at suddenly goes offline?
- patch Tuesday takes your DC down
- hardware hiccup knocks it out for a few minutes
- network segmentation blocks connectivity
- someone accidentally unplugs the wrong cable (Yes even the virtual one)
And all of a sudden, authentication and identity flows break, users are calling and shouting that they can’t work. That’s not a security problem anymore, that’s an availability problem. This blog isn’t another “LDAPS checklist.” It’s a small collection of practical, real-world ways to think about LDAPS as a service, not just a protocol, and how to make sure it stays up when things around it fail.
We’ll approach this step by step:
- What LDAPS really needs from PKI, certificates, SANs, templates, and why this is importand to remember (and use).
- Three architectural patterns:
- Simple hostname-based LDAPS (works, often enough)
- DNS Round Robin (cheap and often good enough)
- True High Availability (load balancer, health checks, service endpoint)
Each pattern has trade-offs. There is no universal “best”, just the right fit for your infrastructure requirements.
Kerberos, DC Locator and load balancers
Before going any further, one important boundary needs to be clear.
This blog post is not about domain-joined systems that use native Active Directory discovery and Kerberos authentication. Domain-joined devices don’t just use LDAP, they use DC Locator, Kerberos, SPNs, site awareness and AD-native discovery mechanisms that are designed to connect to real Domain Controllers using their real identities.
Introducing a generic load balancer in front of Domain Controllers and exposing LDAPS through a single virtual endpoint breaks that model (Don’t do that no really don’t). There is no DC identity behind a virtual service name, no Kerberos principal, no SPN, and no site awareness. From a Kerberos perspective, a load balancer is simply an abstraction layer that does not fit the trust model and can disrupt normal authentication flows.
The LDAPS architectures described here are therefore explicitly intended for non-domain-joined systems and external services, where LDAPS is consumed as a directory service rather than as part of the Kerberos trust model. For domain-joined systems, native AD mechanisms remain not only sufficient, but architecturally correct. This blog does not replace those mechanisms, it exists alongside them.
LDAPS requirements
LDAPS is often described as “LDAP over TLS”, which sounds simple, but in practice, it’s not a protocol switch, it’s really more a trust model. LDAPS does not work because port 636 is open. It works because clients trust the identity of the server they are connecting to, in essence it’s the same when connecting to a web server over TLS, it works because there’s a trust model to the CA server that signed the certificate of the web server. That trust is built entirely on certificates and PKI.
At a minimum, a Domain Controller offering LDAPS must have a certificate that:
- The LDAPS certificate is located in the Local Computer’s Personal certificate store (programmatically known as the computer’s MY certificate store).
- A private key that matches the certificate is present in the Local Computer’s store and is correctly associated with the certificate. The private key must not have strong private key protection enabled.
- The Enhanced Key Usage extension includes the Server Authentication (1.3.6.1.5.5.7.3.1) object identifier (also known as OID).
- The Active Directory fully qualified domain name of the domain controller (for example, dc01.contoso.com) must appear in one of the following places:
- The Common Name (CN) in the Subject field.
- DNS entry in the Subject Alternative Name extension.
- The certificate was issued by a CA that the domain controller and the LDAPS clients trust. Trust is established by configuring the clients and the server to trust the root CA to which the issuing CA chains.
- Use the Schannel cryptographic service provider (CSP) to generate the key.
I didn’t make these up, it’s a simple copy from the Microsoft official documentation that you can read here.
Certificate templates
When people talk about LDAPS, the focus is usually on certificates, but almost never on which certificate. Technically, almost any certificate with Server Authentication can make LDAPS work. Even a generic Web Server template will do the job (t.b.h, this is what I see the most in the field). But Active Directory is not a generic service, and Domain Controllers are not just LDAP endpoints. They are identity providers. Because of that, Microsoft has (almost) always shipped dedicated certificate templates for Domain Controllers. Over time, three templates were introduced:
- Domain Controller (Introduced with Windows 2000)
- Domain Controller Authentication (Introduced with Windows 2003)
- Kerberos Authentication (Introduced with Windows 2008)
All three templates support LDAPS. But they differ in how they identify a Domain Controller, which identities they include in the certificate, and how future-proof they are in real-world environments. When selecting a certificate template, you shouldn’t just look at what works today, you should choose the one that offers the most functionality.
Think about it this way: If you deploy a certificate now with only Server Authentication, and a year later you need smart card authentication, you’ll end up adding another certificate. That’s where things start getting messy.
LDAPS doesn’t “select” certificates intelligently. If multiple certificates contain Server Authentication, it simply picks one. If that certificate doesn’t contain the DNS name you’re connecting to, the connection fails, and it fails in a way that looks random. So the rule is simple:
Choose the certificate with the broadest functionality, even if it feels like overkill. You’ll thank yourself (or me) later.
In the next two tables, I’ll show the functionality of the different templates and their Subject Alternative Names. A SAN, Subject Alternative Name, is simply an extra identity on a certificate. If a certificate is installed on dc-lab-01.corp.michaelwaterman.nl and you want clients to connect to ldap.corp.michaelwaterman.nl, you add that name as a SAN. That’s all it is: extra names, same identity.
Certificate template application policies
| Certificate Template | Server Authentication | Client Authentication | Smart Card Logon | KDC Authentication |
| Domain Controller | X | X | ||
| Domain Controller Authentication | X | X | X | |
| Kerberos Authentication | X | X | X | X |
Available Subject Alternative Names
| Certificate Template | SAN entries |
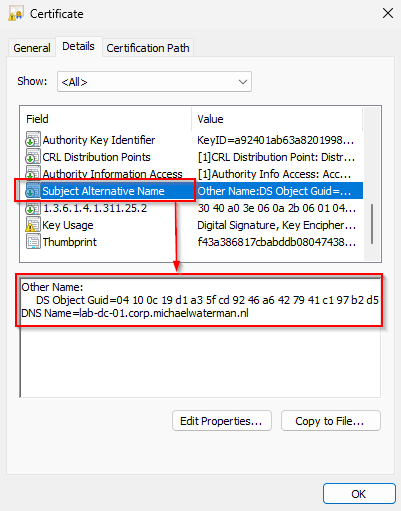
| Domain Controller | DS Object GUID, DC DNS name |
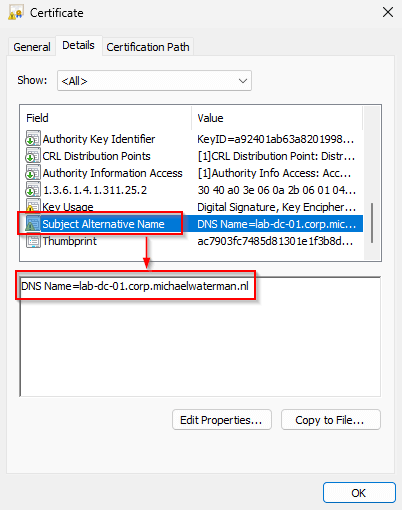
| Domain Controller Authentication | DC DNS name |
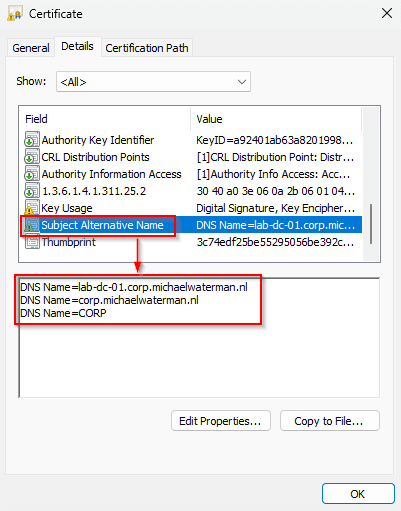
| Kerberos Authentication | AD DNS Domain, AD Name, DC DNS name |
Note! These are the default SAN entries, it’s possible to add additional information when selecting the “Subject Name” tab in the template.
Autoenrollment
Auto-enrollment is the mechanism that allows Windows systems to automatically request, receive, and renew certificates from an Enterprise CA without manual interaction. When auto-enrollment is enabled, Domain Controllers and domain-joined machines periodically check whether they are eligible for new certificates based on certificate templates, security permissions, and Group Policy configuration. If a matching template is available and the system has enroll rights, the certificate is requested and installed automatically.
This process also handles renewal. Certificates are reissued before expiration using the same template and identity information, without administrator intervention. For standard AD scenarios, such as machine authentication, domain controller certificates, or Kerberos-related templates, autoenrollment is the normal and expected deployment model.
For our setup we need autoenrollment to work, it’s really not that hard to configure. I’m assuming that you know how to create a Group Policy, open that policy and browse to:
Computer Configuration → Policies → Windows Settings → Security Settings → Public Key Policies → Certificate Services Client – Auto-Enrollment
Configure these settings:
- Configuration Model: Enabled
- Select: Renew expired certificates, update pending certificates, and remove revoked certificates.
- Select: Update certificates that use certificate templates
leave the rest default.
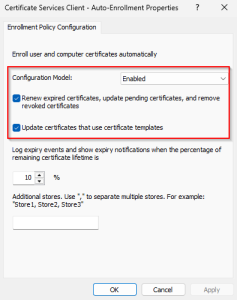
After configuring the policy, link it to the appropriate Organizational Unit (OU).
Configuring the template
Now that we’ve determined which template to use (Kerberos Authentication), we can start preparing it for deployment on the CA. At the start of this blog I promised three different LDAPS architectures. I’ll show all three, but the first two will be combined into a single certificate. When this section is finished, you’ll be able to connect using:
- the DNS hostname:
dc-lab-01.corp.michaelwaterman.nl - the domain name:
corp.michaelwaterman.nl
Using the domain name allows DNS round robin to distribute connections across multiple Domain Controllers, automatically spreading the load. That alone already removes the single-DC dependency that many LDAPS setups suffer from. (problem solved, kinda)
For most environments, this is more than sufficient. If a short service interruption is acceptable and full service-level continuity isn’t a hard requirement, this approach is often the right balance between simplicity and resilience.
Let’s build the certificate template.
Template build
- Open “Certificate Management” and connect to your CA.
- Right click on “Certificate Templates” and select “Manage“, this opens your template store.
- Right click the “Kerberos Authentication” template and select “Duplicate Template“.
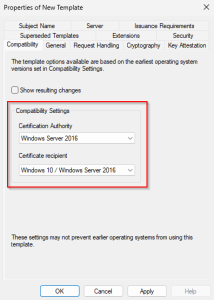
- On the “Compatibility“, select the target operating systems. For our goal it really doesn’t matter, this is just what I normally do.
- On the “General” tab, give the template a name, for example “Corp Kerberos Authentication“.
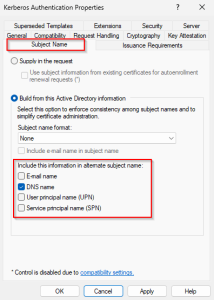
- Make sure that on the “Subject Name” tab, “Build from this Active Directory information” is selected and “DNS name” in the section “Include this information in alternate subject name“
- On the security tab, make sure that it is exactly as in the table below:
| Group / User | Permission |
| Authenticated Users | Read |
| Enterprise Read-only domain Controllers | Enroll Autoenroll |
| Domain Admins | Read Write Enroll |
| Domain Controllers | Enroll Autoenroll |
| Enterprise Admins | Read Write Enroll |
| Enterprise Domain Controllers | Enroll Autoenroll |
Note! Enroll means that this identity can manually request this certificate, Autoenroll means that this certificate can be used with autoenrollment that we configured a moment ago.
- For now this is enough for what we need to accomplish, click “OK” and return to “Certificate Management“
- Right click on “Certificate Templates” → “New” → “Certificate Template to Issue“.
- Select “Corp Kerberos Authentication“, Click “OK“.
We now have the certificate ready for deployment.
Deploying the certificate
Once the template is published on the CA and permissions are configured, deployment becomes straightforward. Domain Controllers will automatically request and install the certificate through Group Policy auto-enrollment.
In most cases, you can simply wait for the next Group Policy refresh cycle. The Domain Controller will pick up the new template, request the certificate, and install it without further action.
If you don’t want to wait, you can trigger auto-enrollment manually by running:
certutil -pulseThis forces the system to immediately check for new certificate templates and request the certificate right away.
After that, LDAPS will automatically start using the newly installed certificate.
Testing LDAPS connectivity from Ubuntu
With certificates deployed and LDAPS active, the next step is validating connectivity from a non-domain-joined system. In this example, I’ll use an Ubuntu desktop to verify trust, connectivity, and DNS round-robin behavior.
Trusting the CA on Ubuntu
First, copy your Root CA (and issuing CA if applicable) certificates from Windows to your Ubuntu machine. If they were exported in binary (DER) format, convert them to PEM:
openssl x509 -inform der -in Corp-Root-CA.crt -out Corp-Root-CA.pem
openssl x509 -inform der -in Corp-Enterprise-CA.crt -out Corp-Enterprise-CA.pemInstall them into Ubuntu’s trust store:
sudo cp Corp-Root-CA.pem /usr/local/share/ca-certificates/Corp-Root-CA.crt
sudo cp Corp-Enterprise-CA.pem /usr/local/share/ca-certificates/Corp-Enterprise-CA.crt
sudo update-ca-certificates --freshYour system now trusts certificates issued by your AD PKI.
Verifying LDAPS connectivity
You can now test the TLS connection:
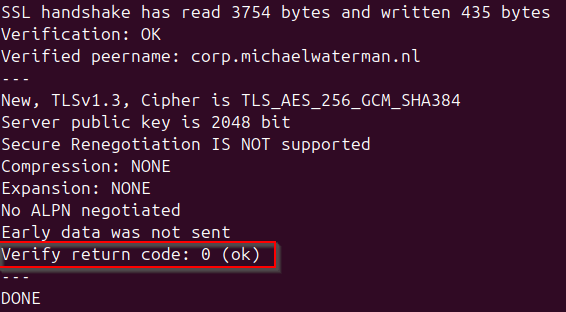
openssl s_client -connect corp.michaelwaterman.nl:636 \
  -verify_hostname corp.michaelwaterman.nl \
< /dev/nullA successful test ends with, “Verify return code: 0 (ok)“. indicating both TLS trust and hostname validation are correct.
Installing LDAP tools
Just in case the ldap tools are not already installed on your system, use this command to install them.
sudo apt install ldap-utilsPerforming an LDAP query
A simple RootDSE query confirms LDAP functionality:
ldapsearch -H ldaps://corp.michaelwaterman.nl:636 \
  -D "CN=Administrator,CN=Users,DC=corp,DC=michaelwaterman,DC=nl" \
  -W \
  -b "DC=corp,DC=michaelwaterman,DC=nl" \
  "(objectClass=computer)" cn \
-LLL -z 5You will be prompted for a password first, If authentication succeeds and you get actual data, LDAPS is working correctly and you will see the information for 5 computer objects on your screen.
Showing DNS round robin in action
Now, this blog post is about creating a high availability setup, while I’ve build everything, showed connectivity and even being able to query the directory, I haven’t show you how to actually test the round robin feature. To demonstrate load distribution across Domain Controllers, run the query multiple times:
for i in {1..5}; do
  echo | openssl s_client -connect corp.michaelwaterman.nl:636 2>/dev/null \
    | openssl x509 -noout -ext subjectAltName \
    | grep DNS: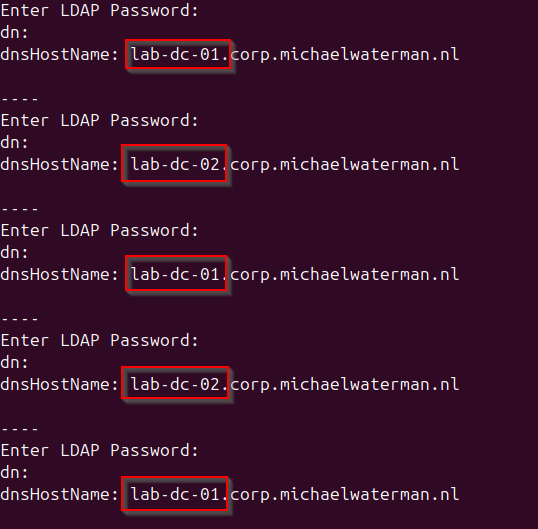
doneYou’ll see different Domain Controllers answering requests, showing that DNS round robin already distributes load across your DCs.

Note! At this point, it’s worth noting that DNS round robin is not real load balancing. DNS simply returns multiple IP addresses and the client decides which one to use, often caching the result for some time.
This means connections may still end up going to the same Domain Controller repeatedly, and DNS itself has no awareness of server health. A prime example can be seen in the image above, DC-02 is queried multiple times in a row. If one DC becomes unavailable, clients may still try to connect until DNS cache entries expire.
For many environments this behavior is perfectly acceptable. But when service continuity becomes critical, a solution with health checks and active load management becomes desirable, let’s dive into the next chapter!
High-available LDAPS using HAProxy
In the previous section I used DNS round robin to distribute LDAPS connections across Domain Controllers. For many environments, that approach is more than sufficient. But when LDAPS becomes a critical dependency, DNS alone may not provide enough control or resilience.
A common next step is introducing a load balancer in front of the Domain Controllers. In this example, I use HAProxy, although the same concept applies to other load balancing solutions, this is just for demonstration purposes.
The configuration and deployment of HAProxy itself are outside the scope of this blog post. The only important requirement here is:
The load balancer must operate in TCP passthrough mode.
TLS termination must not happen on the load balancer.
If TLS is terminated on the load balancer, the Domain Controller certificate is no longer presented to the client, which breaks LDAPS trust and interferes with authentication flows. The load balancer should simply forward encrypted traffic to available Domain Controllers while performing health checks in the background.
To introduce the load balancer cleanly, I’ll start by creating a DNS record that represents the LDAPS service:
ldaps.corp.michaelwaterman.nlThis record points to the public or client-facing interface of the load balancer. In my case that will be “192.168.66.53”. From this point forward, clients connect to the service endpoint rather than individual Domain Controllers.
Preparing certificate issuance
Because the LDAPS endpoint now represents a service identity rather than an individual Domain Controller, the certificate must include this new DNS name.
Unlike the earlier templates, this certificate cannot be deployed automatically through Group Policy auto-enrollment. The template needs to allow administrators to supply Subject Alternative Names manually. Well, at least not the initial deployment, autoenrollment will work afterwards.
On the CA, duplicate the Kerberos Authentication template and configure the following changes:
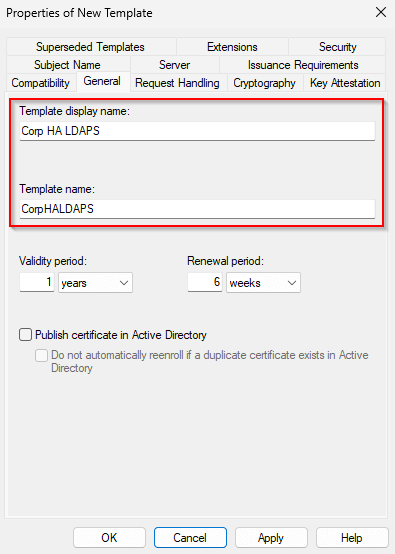
- On the General tab, name the template:
- Corp HA LDAPS
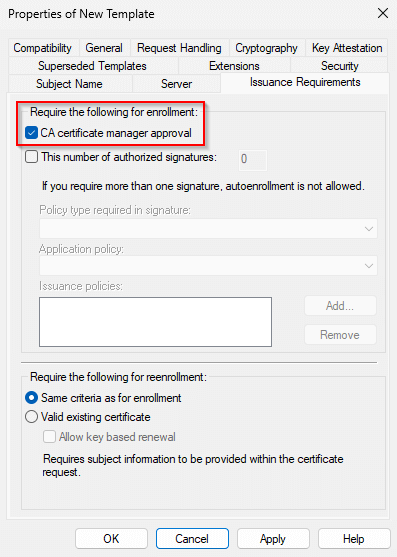
- On Issuance Requirements, enable:
- CA certificate manager approval
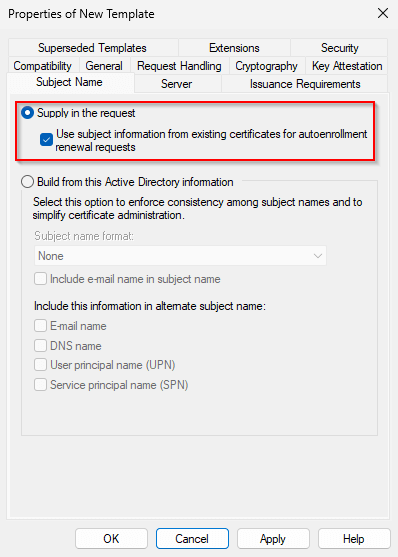
- On the Subject Name tab, select:
- Supply in the request
- Enable: Use subject information from existing certificates for autoenrollment renewal requests
Note! In practice, leaving the default application policies intact is usually harmless, since LDAPS only relies on Server Authentication. However, environments with strict certificate governance may choose to reduce policies to Server Authentication only.
Allowing subject information to be supplied in the request is required because the certificate must now represent a service name rather than a specific Domain Controller.
This setting also opens the possibility of requesting certificates for unintended identities. For that reason, enabling CA manager approval or similar governance controls is strongly recommended. Finally, publish the template on the CA so it becomes available for enrollment.
In the next step, I’ll request the certificate using a traditional INF-based request, followed by a simpler PowerShell-based alternative.
Requesting the certificate
At this point the template is published and ready. Because this certificate represents a service identity (ldaps.corp.michaelwaterman.nl) and not a single DC identity, I’ll request it manually.
Option 1 — INF-based request (classic)
Create a file named ldaps-ha.inf on the Domain Controller (or on the machine that will enroll the certificate) with the following content:
[Version]
Signature="$Windows NT$"

[NewRequest]
Subject = "CN=lab-dc-01.corp.michaelwaterman.nl"
KeySpec = 1
KeyLength = 2048
Exportable = FALSE
MachineKeySet = TRUE
SMIME = FALSE
PrivateKeyArchive = FALSE
UserProtected = FALSE
UseExistingKeySet = FALSE
ProviderName = "Microsoft RSA SChannel Cryptographic Provider"
ProviderType = 12
RequestType = PKCS10
HashAlgorithm = sha256
KeyUsage = 0xa0

[Extensions]
2.5.29.17 = "{text}"
_continue_ = "dns=lab-dc-01.corp.michaelwaterman.nl&"
_continue_ = "dns=ldaps.corp.michaelwaterman.nl&"
_continue_ = "dns=corp.michaelwaterman.nl"

[RequestAttributes]
CertificateTemplate = CorpHALDAPS
Note! Change the first DNS entry to reflect the name of your DC.
Note! In the [Extensions], you can see that I’ve also included the domain name, “corp.michaelwaterman.nl“. This way you can create a multi-purpose certificate and use it for all scenario’s.
Tip! Generate the request by using this PowerShell commend if you’re working remotly:
$inf = @"
PASTE CONTENT HERE
"@

Invoke-Command -ComputerName lab-dc-01 -ScriptBlock {
    param($content)
    $content | Out-File C:\ldaps-ha.inf -Encoding ascii
} -ArgumentList $infNext, generate the request:
certreq -new ldaps-ha.inf ldaps-ha.reqSubmit it to the CA:
certreq -submit -config "lab-ent-ca\Corp-Enterprise-CA" ldaps-ha.reqNote the request ID, you’ll need it later on. If CA Manager Approval is enabled, the request will remain pending until it’s approved. Open up your CA and approve it first. Once issued, retrieve the certificate as following:
certreq -config "lab-ent-ca\Corp-Enterprise-CA" -retrieve 40 ldaps-ha.cerLast but not least, install the certificate on the machine.
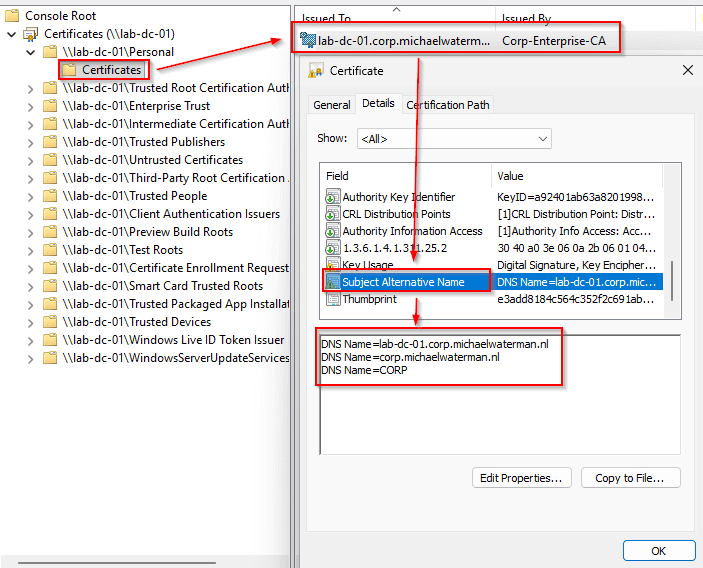
certreq -accept <issued_certificate.cer>After acceptance, the certificate will appear in: Local Computer → Personal (LocalMachine\My)
Option 2 — PowerShell request (simpler)
If you prefer a cleaner and more modern approach, you can request the same certificate using PowerShell (of course you can…). When certificate manager approval is enabled (And it should in this case), the request remains pending until approved on the CA.
First execute the command below to request a certificate. The next step is to open your CA Manager and approve the request.
$enroll = Get-Certificate `
   -Template "CorpHALDAPS" `
   -SubjectName "cn=lab-dc-02.corp.michaelwaterman.nl" `
   -DnsName lab-dc-02.corp.michaelwaterman.nl, ldaps.corp.michaelwaterman.nl, corp.michaelwaterman.nl `
-CertStoreLocation "cert:\LocalMachine\My"Once the request is approved, retrieve the certificate and install it.
$request = Get-ChildItem Cert:\LocalMachine\Request\$($enroll.Request.Thumbprint)
Get-Certificate -Request $requestThe certificate is installed automatically into the Local Machine certificate store.
Note! This should be done on all your Domain Controllers.
Installing and configuring HAProxy
This blog post is not intended as a full HAProxy configuration guide. The goal here is simply to demonstrate how LDAPS traffic can be distributed across multiple Domain Controllers using health checks. More information about configuring HAProxy can be found here.
The important detail is that HAProxy must operate in TCP mode, forwarding encrypted traffic without terminating TLS. Domain Controllers must present their own certificates directly to clients. I’ll briefly walk through a minimal setup.
Installing HAProxy
For this demo I’m using Ubuntu Server 24.04. On the server, install HAProxy with:
sudo apt update
sudo apt install haproxy -yAfter installation, the service is installed but typically not yet configured for our scenario.
Backing up the default configuration
Before making changes, create a backup of the original configuration:
sudo cp /etc/haproxy/haproxy.cfg /etc/haproxy/haproxy.cfg.originalThis allows you to quickly restore the default configuration if needed.
Editing the configuration
Open the configuration file:
sudo nano /etc/haproxy/haproxy.cfgAdd the following configuration to create an LDAPS frontend and backend:
 global
        log /dev/log    local0
        log /dev/log    local1 notice
        chroot /var/lib/haproxy
        stats socket /run/haproxy/admin.sock mode 660 level admin
        stats timeout 30s
        user haproxy
        group haproxy
        daemon

        # Default SSL material locations
        ca-base /etc/ssl/certs
        crt-base /etc/ssl/private

        # See: https://ssl-config.mozilla.org/#server=haproxy&server-version=2.0.3&config=intermediate
        ssl-default-bind-ciphers ECDHE-ECDSA-AES128-GCM-SHA256:ECDHE-RSA-AES128-GCM-SHA256:ECDHE-ECDSA-AES256-GCM-SHA384:ECDHE-RSA-AES256-GCM-SHA384:ECDHE-ECDSA-CHACHA20-POLY1305:ECDHE-RSA-CHACHA20-POLY1305:D>
        ssl-default-bind-ciphersuites TLS_AES_128_GCM_SHA256:TLS_AES_256_GCM_SHA384:TLS_CHACHA20_POLY1305_SHA256
        ssl-default-bind-options ssl-min-ver TLSv1.2 no-tls-tickets

defaults
        log     global
        mode    tcp
        option  tcplog
        option  dontlognull
        timeout connect 5000
        timeout client  50000
        timeout server  50000
        errorfile 400 /etc/haproxy/errors/400.http
        errorfile 403 /etc/haproxy/errors/403.http
        errorfile 408 /etc/haproxy/errors/408.http
        errorfile 500 /etc/haproxy/errors/500.http
        errorfile 502 /etc/haproxy/errors/502.http
        errorfile 503 /etc/haproxy/errors/503.http
        errorfile 504 /etc/haproxy/errors/504.http

frontend fe_ldaps
    bind 192.168.66.53:636
    default_backend be_ldaps

backend be_ldaps
    balance roundrobin
    option tcp-check
    tcp-check connect
    server dc1 192.168.66.10:636 check
    server dc2 192.168.66.11:636 check
source 192.168.66.53Replace the server addresses with your Domain Controller IP addresses and point the source to the IP of the server.
Testing and starting HAProxy
Before restarting the service, validate the configuration:
sudo haproxy -c -f /etc/haproxy/haproxy.cfgIf the configuration is valid, restart HAProxy.
sudo systemctl restart haproxyThe load balancer is now ready to distribute LDAPS connections across your Domain Controllers.
Testing LDAPS high availability
With HAProxy now configured and certificates correctly installed (hopefully), I can now validate whether LDAPS remains available when individual Domain Controllers become unavailable.
First, verify that LDAPS works through the load balancer:
openssl s_client -connect ldaps.corp.michaelwaterman.nl:636 \
  -servername ldaps.corp.michaelwaterman.nl \
< /dev/nullA successful response (Verify return code: 0 (ok)) shows the certificate chain and confirms a working TLS handshake. Next, perform a simple LDAP query:
ldapsearch -H ldaps://ldaps.corp.michaelwaterman.nl:636 \
  -D "CN=Administrator,CN=Users,DC=corp,DC=michaelwaterman,DC=nl" \
  -W \
-b "" -s base dnsHostNameThe returned dnsHostName value shows which Domain Controller handled the request. To demonstrate load balancing, repeat the query several times:
for i in {1..5}; do
  ldapsearch -H ldaps://ldaps.corp.michaelwaterman.nl:636 \
    -D "CN=Administrator,CN=Users,DC=corp,DC=michaelwaterman,DC=nl" \
    -W \
    -b "" -s base -LLL dnsHostName
  echo "----"
doneYou should see responses alternating between Domain Controllers.
Finally, simulate failure by shutting down one Domain Controller and repeat the test. HAProxy automatically removes unavailable servers from rotation, and LDAPS queries continue to succeed without service interruption.
This confirms that LDAPS remains available even when individual Domain Controllers are offline.
LDAPS certificate selection
One aspect that often causes confusion is how a Domain Controller decides which certificate to use for LDAPS. Unlike web servers, Active Directory does not allow you to explicitly bind a certificate to LDAPS. Instead, the Domain Controller automatically selects a certificate from the local machine store based on a number of requirements.
In short, the certificate must:
- reside in the Local Computer → Personal store,
- contain the Server Authentication application policy,
- include the correct DNS name in the Subject or SAN, and
- have an accessible private key.
If multiple certificates meet these conditions, Active Directory simply chooses one. There is no guarantee which one will be selected.
This can lead to confusing behavior where LDAPS sometimes works and sometimes fails, depending on which certificate gets picked. If the selected certificate does not contain the hostname used by clients, TLS validation fails and the connection is rejected. For that reason, it is good practice to keep the number of certificates with Server Authentication capability on Domain Controllers limited, and ensure the remaining certificate contains all required DNS names.
When troubleshooting LDAPS issues, always check which certificate is currently being presented:
echo | openssl s_client -connect lab-dc-01.corp.michaelwaterman.nl:636 2>/dev/null \
| openssl x509 -noout -fingerprint -sha1The output should match the thumbprint from the certificate on the DC, use the following PowerShell command to check the local certificate.
Get-ChildItem -Path Cert:\LocalMachine\My | select Thumbprint, SubjectSuppose you want to check the thumbprint in a loop, you can use this on the Ubuntu machine.
for i in {1..5}; do
  echo | openssl s_client -connect ldaps.corp.michaelwaterman.nl:636 2>/dev/null \
  | openssl x509 -noout -fingerprint -sha1
doneAnd that’s it! I’ve completed the high availability of with LDAPS certificates!Whoop Whoop.
In conclusion
I started with a simple goal, making LDAPS connections more reliable. Along the way, I’ve looked at a couple of practical deployment models. A certificate on each Domain Controller works fine for most environments. DNS round robin already improves availability without adding complexity. And for environments where availability truly matters, a load balancer with health checks ensures dependent services keep running even when a Domain Controller temporarily disappears.
The key takeaway is that LDAPS itself is not complicated. Most challenges come from certificate management, name resolution, and understanding how clients locate domain controllers. Once those pieces are clear, building a reliable setup becomes straightforward.
However, one issue often shows up over time: multiple certificates appearing on Domain Controllers, causing LDAPS to sometimes present the wrong one. Connections then fail seemingly at random, leading to frustrating troubleshooting sessions.
In the next post, I’ll dive into exactly that problem, how Active Directory selects certificates, why multiple certificates cause unpredictable behavior, and how to prevent or fix it in a clean and maintainable way.
Stay tuned…
Leave a Reply