A little while ago, I wrote about the shift toward passwordless authentication and why we need to rethink our dependency on traditional passwords. While I’m still convinced that passwordless is the future, and the sooner we get there, the better. At the same time I also see the reality most environments are still dealing with.
During the audits I perform, I see organizations massively struggling with password policies and the ability to control weak passwords. That’s yet another reason to move toward passwordless… but let’s be honest:
The truth is: we’re not quite there yet.
Legacy systems, user behavior, and years of accumulated technical debt make a full transition challenging for many organizations. In the meantime, we can’t afford to stand still. We have to proactively reduce the risk that passwords still pose.
One of the most overlooked, but incredibly effective, ways to do that is by checking whether your Active Directory passwords are already publicly available in known data breaches. Because yes, your users might be reusing credentials that are floating around in lists like Have I Been Pwned.
Now, you might be thinking: “But Mike, isn’t this old news?”
And you’d be absolutely right. The concept isn’t new, but I’ve found that many people still have no idea how to actually do this, and often fall back on commercial tools. While there’s nothing wrong with that, it does raise questions around:
- Cost
- Trust: is the tool handling your credentials securely?
- Cloud uploads or third-party APIs
I want to give you an alternative: An offline, transparent method that gives you full control.
And more than that, I want to share this knowledge as widely as I can. I’m lucky to have a network of brilliant, curious people, and I believe that if even a handful of us apply this… we make the world just a little safer.
Let’s dive in.
My lab setup: Simulating the problem
To simulate a realistic risk scenario, I created a test Active Directory environment with 100 users. I then used PowerShell to assign each of them a password randomly chosen from a list of the top 20 most commonly used passwords, the kind that are technically complex enough to pass AD’s default policy, but still dangerously predictable.
The result? Every single one of them was accepted without issue.
Get the demo script from my GitHub repro.
That’s exactly the problem. These passwords feel secure because they satisfy the policy, but many are already known and actively exploited.
How do we check passwords against breach data?
In the rest of this post, I’ll walk you through how to:
- Download the NTLM hash list from HaveIBeenPwned.
- Back up your
ntds.dit(AD database) andSYSTEMregistry hive. - Extract password hashes using PowerShell and DSInternals.
- Compare those hashes against the HIBP data.
- Remove all traces securely.
Step 1: Download the HaveIBeenPwned NTLM hashes
We’ll be working with the PwnedPasswordsDownloader, a .NET tool that lets you download Troy Hunt’s curated list of leaked password hashes.
For our purposes, make sure to download the NTLM hash version:
# First, install the .NET 8 SDK (not just the ASP.NET Runtime)
https://dotnet.microsoft.com/en-us/download/dotnet/8.0

# Install the downloader
dotnet tool install --global haveibeenpwned-downloader

# If you get a NuGet source error:
dotnet nuget add source "https://api.nuget.org/v3/index.json" --name "nuget.org"

# Download the NTLM hashes to a text file (this will take a while!)
haveibeenpwned-downloader.exe -n pwnedpasswords_ntlm
This will give you a massive file called pwnedpasswords_ntlm.txt, containing millions of NTLM hashes collected from real-world data breaches.
Note! At the time of writing this blog the download is already 45Gigs in size, make sure you have sufficient space available!
Why NTLM specifically?
Active Directory stores user passwords as NTLM hashes by default, yes even in modern environments. While Kerberos is used for authentication, the actual password data (as stored in ntds.dit) is hashed using the legacy NTLM algorithm.
That means:
- When we extract hashes from AD using DSInternals (later in this blog), we get NTLM hashes
- To compare them accurately, we need the same format from HaveIBeenPwned
TL;DR: We’re speaking the same “hash language” as AD — and that language is NTLM.
By using NTLM-based breach data, we can do a direct one-to-one comparison without needing to reverse or rehash anything.
Step 2: Back up your Active Directory database
Before we can analyze any passwords, we need to extract the relevant data from Active Directory:
- The
ntds.ditdatabase (which contains password hashes) - The
SYSTEMregistry hive (which contains the boot key)
But let’s get one thing very clear before you begin:
Warning: This is a highly sensitive operation!
You’ll be accessing core components of your Domain Controller, files that were never meant to leave the system. Mishandling them can cause serious security risks or system instability.
Always use an isolated lab environment or a snapshot to gain familiarity with the process before doing this in production.
Requirements:
- You must be a Domain Admin
- You need to start an elevated (Run as Administrator) Command Prompt
- The target system must be a Domain Controller (virtual or physical)
We’ll use the ntdsutil tool, which is included in Windows Server by default. Specifically, we’ll use the ifm (Install From Media) option.
What does
ifmdo?
Theifmcommand creates a full snapshot of the Active Directory database and related registry files. Originally, it was designed to help set up new Domain Controllers from media. But in this context, it gives us the cleanest, most stable way to extract what we need.
Here’s the process:
ntdsutil
ntdsutil: activate instance ntds
ntdsutil: ifm
ifm: create full D:\temp
ifm: quit
ntdsutil: quit
This creates a set of files under:
D:\temp\Active Directory\
D:\temp\registry\
What you now have:
ntds.dit: The AD database with password hashes.SYSTEM: The registry hive containing the boot key.
Both of these will be needed in the next step to decrypt and extract NTLM hashes.
Pro tip: Once created, copy these files to a secure analysis machine and remove them from the DC immediately.
Step 3: Extract password hashes using DSInternals
Now that we have both the ntds.dit database and the matching SYSTEM registry hive from the Domain Controller, we can extract the password hashes for analysis.
We’ll use the awesome DSInternals PowerShell module by Michael Grafnetter, a trusted tool for forensic analysis and low-level Active Directory operations. Cool side note that Michael is also a huge StarWars fan like myself, must be in the name!
Install DSInternals (if you haven’t already):
Install-Module -Name DSInternalsIf prompted to install from an untrusted repository, type Y to confirm (or use -Force to skip the prompt in test environments).
Step-by-step extraction process
Now let’s extract the password hashes from the .dit file using the boot key from the SYSTEM hive.
1. Load the boot key from the SYSTEM registry hive:
$Key = Get-BootKey -SystemHiveFilePath "D:\Temp\registry\SYSTEM"This decrypts the SYSKEY stored in the SYSTEM registry, the key we need to unlock encrypted content inside ntds.dit.
Why is this important?
Thentds.ditdatabase is not portable between machines. It is cryptographically bound to the specific Domain Controller it was created on. This is by design: Microsoft protects the sensitive contents of Active Directory (like NTLM hashes and Kerberos secrets) using a combination of encryption layers.One of those layers is the boot key (SYSKEY), stored in the SYSTEM registry hive, which unlocks additional keys that are used internally by AD to encrypt password data. Without this specific boot key, the content of
ntds.ditcannot be decrypted.That means if you copy the
.ditfile from DC01 and try to read it on another system without the matching SYSTEM hive from DC01, it simply won’t work. This ensures that password data remains secure, even if the database is exfiltrated.
2. Extract password hashes from the AD database:
Get-ADDBAccount -BootKey $Key `
    -DatabasePath D:\Temp\Active Directory\ntds.dit" `
    -All `
    -ExportFormat HashcatNT |
    Out-File D:\Temp\Hashdump.txt
This command does the following:
- Decrypts the
ntds.ditdatabase using the boot key - Extracts all available NTLM password hashes from all user objects
- Outputs them in Hashcat-compatible NTLM format to a plain text file
Each line in the resulting Hashdump.txt will look something like (username:hash):
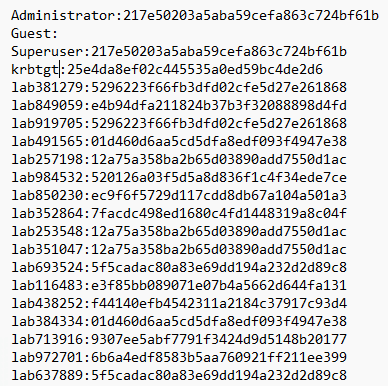
Why Hashcat format? It’s standardized, widely supported, and works seamlessly with matching tools and password auditing workflows. At this point, you now have:
- A list of all AD user accounts
- Their corresponding NTLM password hashes
- A secure local file (
Hashdump.txt) ready for comparison
Step 4: Compare hashes using Match-ADHashes
Now that we’ve extracted all password hashes from Active Directory and downloaded the massive NTLM hash list from HaveIBeenPwned, it’s time to compare the two.
To do this, we’ll use a PowerShell module called Match-ADHashes, developed by DGG-IT. It’s specifically designed to compare AD hash dumps to public breach data in an efficient, offline and transparent way, without sending anything externally.
Requirements:
Hashdump.txt: the NTLM hashes exported from your AD environmentpwnedpasswords_ntlm.txt: the HIBP NTLM hash list you downloaded earlier
Step-by-step instructions
1. Download and import the comparison module:
First, clone or download the script from GitHub:
git clone https://github.com/DGG-IT/Match-ADHashes.git
cd Match-ADHashes
Import-Module .\Match-ADHashes.ps1 -Force
If you’re not using Git, just download the .ps1 file manually and place it in your working directory.
2. Run the hash comparison:
$list = Match-ADHashes `
    -ADNTHashes "D:\Temp\Hashdump.txt" `
    -HashDictionary "D:\data\pwnedpasswords_ntlm.txt"
What this does:
- It reads each NTLM hash from your AD dump
- It checks for matches in the breach data
- If a match is found, it records:
- The matched hash
- The number of times it appeared in breaches (Frequency)
- The associated AD user(s)
Note! This will take a long time, usually an hour or more depending on the number if users and your available hardware.
3. Export the results to a CSV:
$list | Select Hash, Frequency, @{Name=’User’; Expression = {[string]::Join(“;”, $_.User)}} |
Export-Csv -Path "C:\Temp\Matched-Hashes.csv" -Delimiter ';' -NoTypeInformation
This will give you a clean report with every matched user and how common their password is in public breaches. A high frequency value (e.g. 2,345,678) means that password has been reused and leaked millions of times.
Example output:
| User | Frequency | Hash |
| {lab491565, lab384334, lab149216, lab549150…} | 205 | 01D460D6AA5CD5DFA8EDF093F4947E38 |
| {lab257198, lab253548, lab351047, lab203673…} | 80 | 12A75A358BA2B65D03890ADD7550D1AC |
| {Administrator, Superuser} | 76603 | 217E50203A5ABA59CEFA863C724BF61B |
If you see results like these, those users are walking around with time bombs for passwords, and attackers are already holding the match. Change those passwords immediately.

Bonus insight: What if someone gets the hashes?
It’s tempting to think that “a hash isn’t a password”, and that storing hashes isn’t as bad as storing cleartext credentials. But unfortunately, that’s not true.
If someone gets their hands on the NTLM hashes you extracted, even without the original passwords , they might still be able to do lateral movement with tools like MimiKatz or reverse them using public hash databases like hashes.com.
How? Sites like hashes.com maintain massive lookup tables of pre-cracked password hashes, collected from public breaches and cracking sessions. If your hash appears in their database, anyone can look up the original password in plain text… in seconds.
A match on hashes.com doesn’t just prove the password is weak — it gives attackers the exact password to try against other systems.
Deleting the hash files after use isn’t just good practice, it protects you from situations where your own internal audit data becomes the next attack vector. Hence the last chapter for today.
Step 5: Secure cleanup after testing
Now that your analysis is complete, it’s time for what might be the most important step of all: cleaning up your sensitive files.
During this process, you’ve worked with:
- A full copy of your
ntds.ditActive Directory database - The SYSTEM registry hive containing your domain controller’s boot key
- A list of extracted NTLM password hashes for all users in your environment
- A massive file with billions of known compromised password hashes
All of these files, especially the extracted hash dump, are extremely sensitive. If they end up in the wrong hands, they can be used to crack passwords offline and gain unauthorized access to your systems.
Golden Rule: If you’re not actively analyzing, you should not be storing.
These files should never be:
- Left behind in temporary directories
- Synced to cloud storage like OneDrive or Google Drive
- Emailed, compressed, or shared outside secured environments
How to securely remove the files
Use the following steps to delete the sensitive files and overwrite free space on the drive. This helps prevent file recovery by forensic tools.
# 1. Remove the extracted AD hash dump
Remove-Item "D:\Temp\Hashdump.txt" -Force

# 2. Remove the downloaded breach data
Remove-Item "D:\data\pwnedpasswords_ntlm.txt" -Force

# 3. Overwrite deleted data with zeroes (Windows built-in tool)
cipher /w:D:\Temp
cipher /w:D:\data
cipher /w: will write over free space on the drive with zeroes. It won’t delete individual files, but it makes deleted data much harder to recover.
Recommendations: Now what?
Now that you’ve identified weak or compromised passwords in your environment, the next step is acting on that insight. This is where you move from visibility to improvement.
Here are my key recommendations:
Reset any exposed passwords immediately
If a password was found in the breach data — no matter how “complex” it looks — it should be considered compromised and reset as soon as possible. Don’t assume users will do it themselves. Enforce it.
Repeat this check every 3 to 6 months
This is not a one-time thing. Users tend to fall back into bad habits over time, especially when forced to change passwords regularly.
Implement Azure AD Password Protection
Microsoft offers Password Protection for Active Directory, both in the cloud and on-prem (with a proxy and agent setup). It blocks known weak passwords at the time of creation, including custom banned word lists.
Don’t rely on password complexity rules alone
“Complex” doesn’t mean secure. Users will still find a way to create predictable passwords like Summer2024! or Password1!. Focus on length, uniqueness, and non-reuse instead.
Use MFA everywhere, and aim for passwordless
Wherever possible, strengthen authentication with Multi-Factor Authentication. But long term, the goal should be eliminating passwords altogether.
Whether it’s via Windows Hello for Business, FIDO2 keys, or other platform authenticators, passwordless is the only real way forward.
Good security is never static, it’s a cycle of awareness, action, and adaptation.
You’ve taken the first step. Now keep going. Because a password that’s already public… is no longer a secret.
As always, if you found this information useful, have a question or remark, please let me know. Until next time!
Very well written, thanks a lot, Michael!
What are your thoughts about this: for a given company, even if they are largely passwordless, passwords are still used as a fallback / alternative to, say, Passkeys / WHFB etc. And as we know, a system is only as secure as its weakest link. In a nutshell: would you say it’s possible to go REALLY passwordless? In the sense of even eliminating passwords as fallback – what would be the fallback then? I’m talking scenarios such as a lost or stolen YubiKey, for instance.
At any rate, for many (especially hybrid) orgs on their road to going passwordless, stuff like you show in this how-to will be the way to go for the meantime, i.e. trying to harden our users’ passwords as best as we can.
Thx again,
Gary
Thanks for your reply, Gary! Appreciate the effort.
You’ve touched on an essential point that often comes up in real-world passwordless adoption: can we ever truly go passwordless, and what does that look like when legacy systems still expect a password?
In theory, yes, it’s possible to eliminate passwords entirely, including as fallback. In practice, however, hybrid environments introduce real complexity.
Let’s unpack it a bit:
1. Kerberos Key Trust vs. NTLM fallback
For environments using Windows Hello for Business (WHfB) with Kerberos Key Trust, the idea is to fully authenticate via asymmetric cryptography (your private key, stored in TPM or YubiKey, signs an assertion).
However, WHfB via Key Trust depends on Kerberos. And here’s the kicker: many legacy apps don’t support Kerberos. They fall back to NTLM, which in turn still requires a usable NT hash, meaning, a password is still implicitly part of the auth chain, even if rarely used.
A classic example: LDAPS. Until recently, LDAPS didn’t support Kerberos at all, so authentication would fall back to NTLM, and a password hash was still necessary. This creates a situation where your environment is “mostly passwordless,” but still vulnerable via legacy protocol paths.
2. Application access as the weak link
Even if users authenticate passwordlessly, legacy applications that require basic authentication or NTLM over non-HTTP protocols can’t handle FIDO2 or WHfB directly. This is a major hurdle for truly eliminating the password.
What Can You Do?
There are ways forward, especially for hybrid orgs:
Azure AD Application Proxy can be used to front legacy apps with modern auth (like SSO and Conditional Access), effectively modernizing access even if the backend app is legacy.
For non-HTTP protocols (think SMB, RDP, LDAP), third-party proxies or identity firewalls can sometimes bridge the gap by translating modern auth (e.g. SAML/FIDO2) into what legacy systems expect, with strict conditional access logic in between.
Selective isolation of legacy systems with firewalls, separate credentials, or privileged access workstations (PAWs) can help contain the risk during transition.
What About Fallback?
In a purely cloud-native, modern-auth-only world, fallback can be implemented without passwords using methods like:
Multiple FIDO2 authenticators per user (e.g. two YubiKeys, or YubiKey + device-bound passkey),
Biometric re-enrollment with identity proofing,
Helpdesk-based recovery workflows using temporary access passes (TAPs) in Entra ID.
TL;DR:
You’re absolutely right, in a hybrid world, “passwordless” is a journey, not a toggle. True password elimination only becomes realistic when you can fully leave legacy protocols and on-prem dependencies behind. Until then, measures like hardened passwords, NTLM blocking, and using Azure App Proxy are crucial transitional strategies.
Thanks again for your comment, it really sharpens the conversation!
— Michael
Thanks for your detailed explanation, really appreciate it! 🙂
Hello Michael.
Thanks for the great post. It helped me fix my code. I’ve been doing password audits about every 6 months for several years now.
I was using Format-Custom -View HashcatNT but it stopped working and my subsequent script failed because the data was in the wrong format.
I updated to -ExportFormat HashcatNT and it worked.
I was using the JacksonVD PwnedPasswordsNTLM.exe to test. I also have a script using the Test-PasswordQuality cmdlet.
His exe and Test-PasswordQuality appear to give the same results.
I have not tried the Match-ADHashes module yet.
What are your thoughts on Test-PasswordQuality, keeping it in the DS Internals toolbox.
Hi, the DS Internals toolbox is epic! I’ve had a couple of training moments from Michael Grafnetter. I’ve not had the please to test this specific module.